

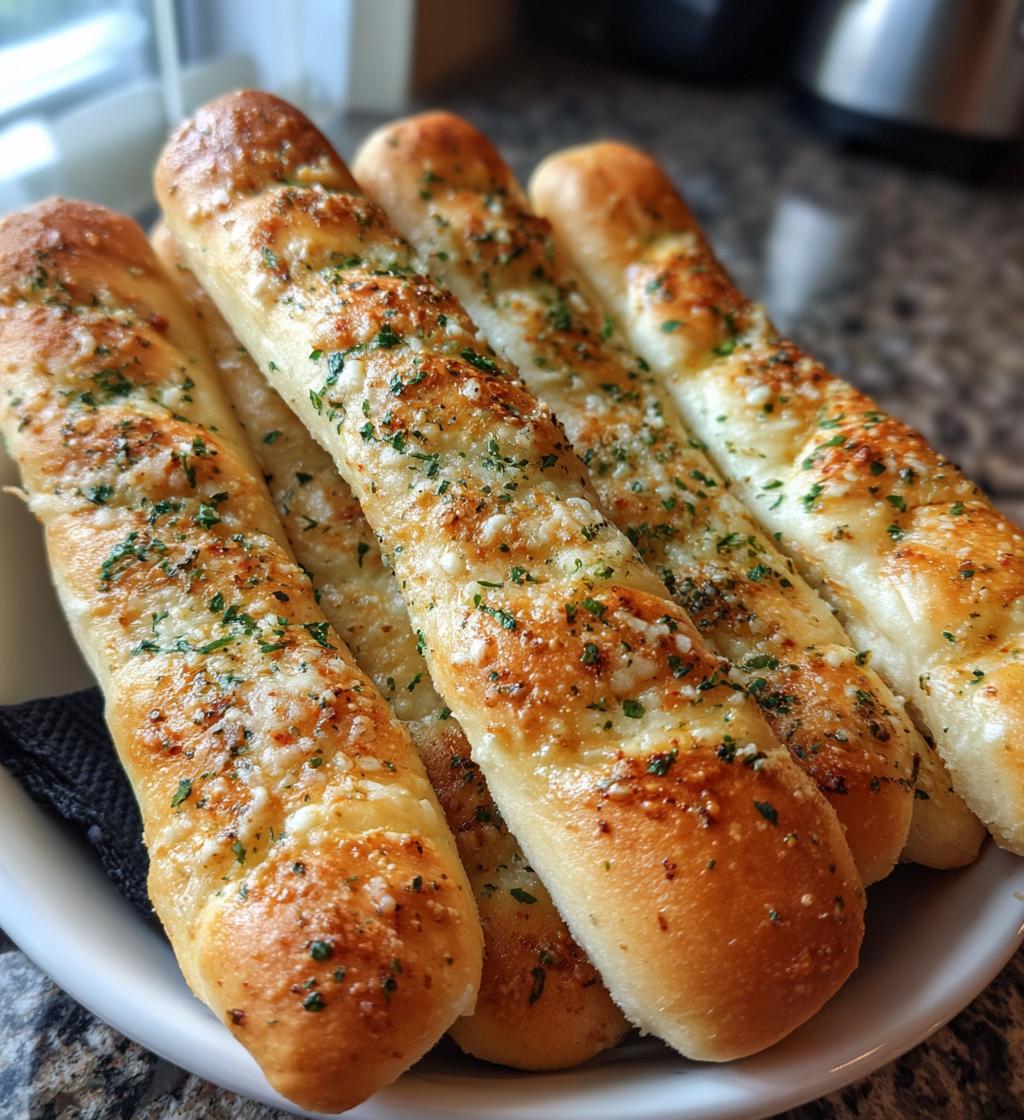
There’s something undeniably comforting about the warm, buttery allure of Olive Garden Breadsticks. Whether you’re dining at the restaurant or enjoying a cozy meal at home, these breadsticks have a way of stealing the show. I still remember the first time I tasted them; the soft, fluffy texture paired with the garlic-infused buttery finish made each bite a delightful experience. It’s no wonder they have become a favorite for many, often served alongside hearty soups and fresh salads. The secret to their undeniable charm lies in their simplicity and the love put into making them. In this article, we will explore how to recreate the magic of Olive Garden Breadsticks right in your own kitchen. With just a handful of ingredients and a little bit of time, you too can enjoy these delicious breadsticks that bring a taste of Italy to your dining table. So, let’s dive into the recipe and learn how to make these delightful treats that are perfect for any occasion!

Ingredients List
To create the delicious Olive Garden Breadsticks, you’ll need the following ingredients:
- 2 cups warm water: This helps activate the yeast for the dough.
- 1 package active dry yeast: Essential for leavening the breadsticks.
- 1/4 cup sugar: Adds a touch of sweetness and helps with browning.
- 1/4 cup olive oil: Provides moisture and flavor to the breadsticks.
- 1 teaspoon salt: Enhances the overall flavor of the dough.
- 5 cups all-purpose flour: The main ingredient that forms the base of the breadsticks.
- 1/2 cup unsalted butter, melted: For brushing on top and adding richness.
- Garlic powder to taste: For that signature garlic flavor.
- Parsley flakes for garnish: To add a pop of color and flavor.
How to Prepare Olive Garden Breadsticks
Making Olive Garden Breadsticks at home is a straightforward process that yields delicious results. Follow these step-by-step instructions to recreate this beloved dish with ease.
Step-by-Step Instructions
Step 1: Activate the Yeast
In a large mixing bowl, combine 2 cups of warm water with 1 package of active dry yeast. Let the mixture sit for about 5 minutes, or until it becomes frothy. This indicates that the yeast is active and ready to help your breadsticks rise.
Step 2: Mix the Wet Ingredients
Once the yeast is activated, add 1/4 cup of sugar, 1/4 cup of olive oil, and 1 teaspoon of salt to the yeast mixture. Stir everything together until well combined. This will infuse the dough with flavor and moisture.
Step 3: Add the Flour
Gradually add 5 cups of all-purpose flour to the wet mixture, one cup at a time, mixing with a wooden spoon or your hands until a dough begins to form. You may not need the entire 5 cups, so keep an eye on the consistency of the dough—it should be soft but not sticky.
Step 4: Knead the Dough
Transfer the dough to a lightly floured surface and knead it for about 5-7 minutes until it becomes smooth and elastic. This step is crucial for developing the gluten, which gives the breadsticks their structure and chewiness. If the dough is too sticky, sprinkle a little extra flour as you knead.
Step 5: Let the Dough Rise
Shape the kneaded dough into a ball and place it in a greased bowl. Cover the bowl with a clean kitchen towel or plastic wrap. Allow the dough to rise in a warm place for about 1 hour, or until it has doubled in size. This rising time is essential for the breadsticks to become fluffy.
Step 6: Shape the Breadsticks
Once the dough has risen, punch it down gently to release the air. Divide the dough into small equal pieces, roughly the size of a golf ball. Roll each piece into a long stick shape, about 6-8 inches in length. Place the shaped breadsticks on a baking sheet lined with parchment paper.
Step 7: Second Rise
Cover the shaped breadsticks with a towel and let them rise again for about 30 minutes. This second rise helps them become even softer and airier.
Step 8: Bake the Breadsticks
Preheat your oven to 400°F (200°C). Once the breadsticks have finished their second rise, bake them for 15-20 minutes or until they are golden brown on top. Keep an eye on them to avoid overbaking.
Step 9: Brush with Butter and Season
As soon as you remove the breadsticks from the oven, brush them generously with 1/2 cup of melted unsalted butter. Then, sprinkle garlic powder and parsley flakes on top to add flavor and a touch of color.
Step 10: Serve Warm
For the best experience, serve your Olive Garden Breadsticks warm. Enjoy them fresh out of the oven alongside your favorite dishes or simply on their own!
Why You’ll Love Olive Garden Breadsticks
- Irresistible Taste: With their soft, buttery texture and garlic-infused flavor, these breadsticks are a delightful treat that will satisfy your taste buds.
- Easy to Make: This recipe breaks down the process into simple steps, making it accessible for both novice and experienced bakers alike.
- Family-Friendly: Kids and adults alike love Olive Garden Breadsticks, making them a hit at family dinners or gatherings.
- Perfect for Any Occasion: Whether paired with a hearty soup, salad, or enjoyed on their own, these breadsticks are versatile for any meal.
- Homemade Freshness: There’s nothing quite like the smell of freshly baked breadsticks wafting through your home, creating a warm and inviting atmosphere.
- Customizable: You can easily tweak the recipe with added herbs, spices, or toppings to suit your personal preferences or dietary needs.
- Great for Leftovers: Olive Garden Breadsticks store well, allowing you to enjoy them later with minimal effort in reheating.
🍴 Top Kitchen Essentials You’ll Love




Tips for Success
To ensure your Olive Garden Breadsticks turn out perfect every time, consider these practical tips:
Perfect Your Kneading Technique
When kneading the dough, aim for a smooth and elastic texture. If your dough feels sticky, gradually sprinkle a little more flour as you knead. A well-kneaded dough is crucial for achieving that classic breadstick chewiness.
Monitor Rising Times
For the best results, allow the dough to rise in a warm, draft-free area. If your kitchen is cool, consider placing the dough in an oven preheated to the lowest setting for a few minutes, then turning it off. Keep an eye on the dough during both rising stages—it should double in size for optimal lightness.
Watch Your Baking Time
Every oven is different, so start checking your breadsticks at the 15-minute mark. They should be golden brown on top. If they look pale, give them a few more minutes but avoid overbaking, as this can lead to dry breadsticks.
Brush with Butter Immediately
As soon as your breadsticks come out of the oven, brush them with melted butter while they’re still hot. This not only adds flavor but also helps keep them moist and enhances that delicious buttery finish.
Experiment with Flavors
Feel free to customize your Olive Garden Breadsticks by adding different herbs and spices into the dough or as toppings. Some popular options include Italian seasoning, Parmesan cheese, or even a sprinkle of sea salt for a gourmet touch.
Serve Warm for Best Flavor
For the ultimate experience, serve your breadsticks warm. This way, they retain their soft texture and buttery taste, making them irresistible additions to any meal.
Storage & Reheating Instructions
To keep your Olive Garden Breadsticks fresh and delicious, proper storage is essential. Here’s how to store and reheat them effectively:
Best Storage Methods
Once your breadsticks have cooled completely, place them in an airtight container or a resealable plastic bag. This will help prevent them from drying out. For optimal freshness, you can also wrap them in plastic wrap before placing them in the container. Store the breadsticks at room temperature for up to 2 days. If you want to keep them for a longer period, consider freezing them.
Freezing Tips
If you choose to freeze your Olive Garden Breadsticks, make sure they are completely cooled. Place the breadsticks in a single layer on a baking sheet and freeze them for about 1-2 hours until solid. Once frozen, transfer them to an airtight container or freezer bag, layering parchment paper between them to prevent sticking. They can be stored in the freezer for up to 3 months.
Reheating Instructions
To reheat your breadsticks, preheat your oven to 350°F (175°C). If you have frozen them, there’s no need to thaw; just place them directly in the oven. Bake for about 10-15 minutes or until they are heated through and the outside is slightly crisp. For an extra touch of flavor, brush them with melted butter and sprinkle with garlic powder before serving. If you’re reheating breadsticks that were stored at room temperature, a 5-10 minute bake should suffice.
By following these storage and reheating instructions, you can enjoy your Olive Garden Breadsticks at their best, even after a day or two!
Nutritional Information
When enjoying Olive Garden Breadsticks, it’s helpful to be aware of their nutritional content. Below are the estimated values for one serving (1 breadstick):
- Calories: 150
- Total Fat: 7g
- Saturated Fat: 4g
- Cholesterol: 15mg
- Sodium: 200mg
- Total Carbohydrates: 20g
- Dietary Fiber: 1g
- Sugars: 1g
- Protein: 3g
These values are estimates and can vary based on specific ingredient brands and preparation methods. Enjoy your Olive Garden Breadsticks in moderation as part of a balanced diet!
FAQ Section
What If My Olive Garden Breadsticks Don’t Turn Out Right?
If your Olive Garden Breadsticks don’t turn out as expected, don’t worry! Common issues include dense breadsticks, which can occur if the dough was not kneaded enough or if it didn’t rise properly. Make sure to knead until smooth and elastic, and ensure that your yeast is active. If they come out too dry, try brushing them with more melted butter before serving.
Can I Prepare This in Advance?
Yes, you can prepare Olive Garden Breadsticks in advance! You can make the dough and let it rise, then shape the breadsticks and refrigerate them for up to 24 hours before baking. Just remember to let them come to room temperature and rise for about 30 minutes before baking. Alternatively, you can bake them ahead of time and store them in an airtight container, reheating them when you’re ready to serve.
What Ingredients Can I Swap?
If you have dietary restrictions or preferences, there are several ingredient swaps you can make for Olive Garden Breadsticks. For a gluten-free version, use a 1:1 gluten-free all-purpose flour blend. If you’re looking to reduce fat, you can substitute the melted butter with olive oil or use a butter alternative. Additionally, you can replace garlic powder with fresh minced garlic for a more intense flavor.
How Can I Make Olive Garden Breadsticks Vegan?
To make Olive Garden Breadsticks vegan, you can replace the unsalted butter with a plant-based butter or olive oil. Ensure that the sugar you use is vegan-friendly, as some sugars are processed with bone char. The rest of the ingredients, including flour, yeast, and water, are naturally vegan.
Can I Add Flavors to My Olive Garden Breadsticks?
Absolutely! Olive Garden Breadsticks are versatile and can be customized to suit your taste. Consider adding herbs like rosemary or thyme to the dough for an aromatic twist. You can also sprinkle cheese, such as Parmesan or mozzarella, on top before baking for a cheesy delight. Experimenting with flavors can elevate your breadsticks even further!
Serving Suggestions
Olive Garden Breadsticks are not only delicious on their own but also pair wonderfully with a variety of dishes and dips. Here are some great serving suggestions to enhance your meal experience:
1. Classic Marinara Sauce
For a traditional pairing, serve your Olive Garden Breadsticks with a warm bowl of marinara sauce. The rich, tangy flavors of the sauce complement the buttery breadsticks perfectly, making for a delightful dipping experience.
2. Hearty Soup
Pair your breadsticks with a comforting soup, such as minestrone or Italian wedding soup. The breadsticks are perfect for dipping into the broth, adding a satisfying texture and flavor to each bite.
3. Fresh Garden Salad
Serving breadsticks alongside a fresh garden salad can create a well-rounded meal. Toss together mixed greens, cherry tomatoes, cucumbers, and your favorite dressing for a light and refreshing side that balances the richness of the breadsticks.
4. Olive Oil and Balsamic Vinegar
For a simple yet elegant presentation, offer a small dish of high-quality olive oil mixed with balsamic vinegar for dipping. This combination enhances the flavor of the breadsticks and adds a gourmet touch to your dining experience.
5. Creamy Alfredo Dip
Take indulgence up a notch by serving your Olive Garden Breadsticks with a creamy Alfredo dip. This rich and cheesy accompaniment will elevate your breadsticks into a decadent treat that’s perfect for special occasions.
These serving suggestions will surely enhance your Olive Garden Breadsticks experience, making them a delightful addition to any meal! Enjoy experimenting with different pairings to discover your favorites!
Print
Olive Garden Breadsticks
- Total Time: 1 hour 35 minutes
- Yield: 24 breadsticks 1x
- Diet: Vegetarian
Description
Delicious breadsticks from Olive Garden, soft and buttery.
Ingredients
- 2 cups warm water
- 1 package active dry yeast
- 1/4 cup sugar
- 1/4 cup olive oil
- 1 teaspoon salt
- 5 cups all-purpose flour
- 1/2 cup unsalted butter, melted
- Garlic powder to taste
- Parsley flakes for garnish
Instructions
- In a bowl, combine warm water and yeast. Let it sit for 5 minutes.
- Add sugar, olive oil, and salt. Mix well.
- Gradually add flour until a dough forms.
- Knead the dough for 5-7 minutes until smooth.
- Place dough in a greased bowl. Cover and let rise for 1 hour.
- Punch down the dough and divide into small pieces.
- Roll each piece into a stick shape.
- Place on a baking sheet and let rise for another 30 minutes.
- Bake at 400°F for 15-20 minutes until golden.
- Brush with melted butter and sprinkle with garlic powder and parsley.
🍴 Top Kitchen Essentials You’ll Love
Notes
- Serve warm for best taste.
- Store leftovers in an airtight container.
- Reheat in the oven for freshness.
- Prep Time: 15 minutes
- Cook Time: 20 minutes
- Category: Appetizer
- Method: Baking
- Cuisine: Italian
Nutrition
- Serving Size: 1 breadstick
- Calories: 150
- Sugar: 1g
- Sodium: 200mg
- Fat: 7g
- Saturated Fat: 4g
- Unsaturated Fat: 2g
- Trans Fat: 0g
- Carbohydrates: 20g
- Fiber: 1g
- Protein: 3g
- Cholesterol: 15mg
Keywords: Olive Garden Breadsticks, homemade breadsticks, easy breadsticks