

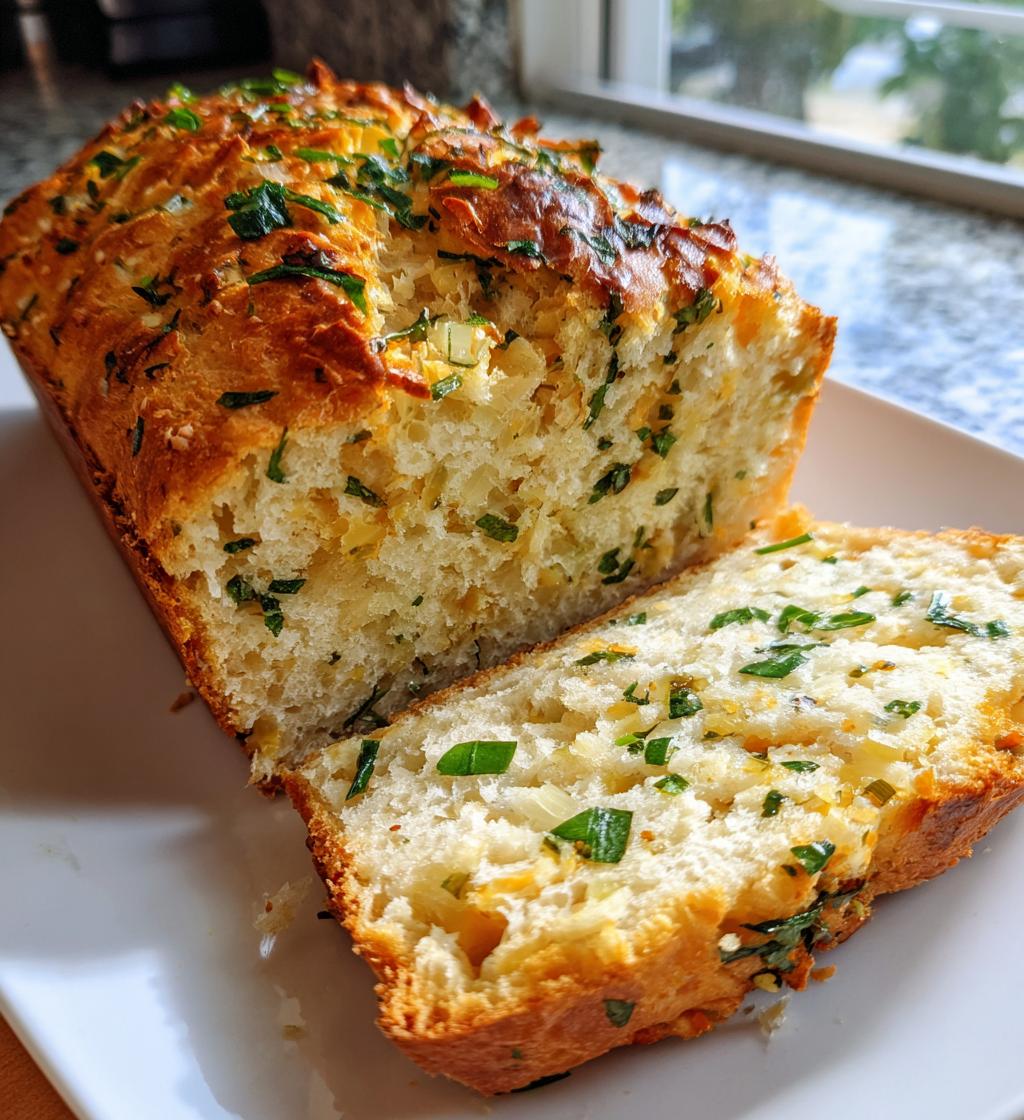
If you’re looking for a bread recipe that bursts with flavor and fills your kitchen with an irresistible aroma, look no further than Garlic Herb Bread. This delightful loaf is not only easy to make but also a surefire way to impress your family and friends. I still remember the first time I baked this bread; the warm, garlicky scent wafted through my home, enticing everyone to gather in the kitchen. Each slice is infused with fresh herbs and rich garlic, making it the perfect accompaniment to any meal or a delicious snack on its own.
What I love most about Garlic Herb Bread is its versatility. Whether you’re serving it alongside a hearty pasta dish, using it to soak up a rich sauce, or simply enjoying it with a pat of butter, this bread elevates every dining experience. Plus, with simple ingredients and straightforward steps, anyone can master this recipe, regardless of their baking experience. Get ready to enjoy a warm, homemade loaf that will have everyone coming back for seconds!
Ingredients for Garlic Herb Bread
To create the delicious Garlic Herb Bread, you will need the following ingredients:
- 3 cups all-purpose flour
- 1 tablespoon sugar
- 1 teaspoon salt
- 2 teaspoons active dry yeast
- 1 cup warm water
- 1/4 cup olive oil
- 4 cloves garlic, minced
- 2 tablespoons fresh parsley, chopped
- 1 tablespoon fresh rosemary, chopped
- 1 tablespoon fresh thyme, chopped
Each ingredient plays a crucial role in developing the rich flavor and aromatic qualities of the bread, with the garlic and herbs taking center stage!
How to Prepare Garlic Herb Bread
Step 1: Activate the Yeast
Begin by activating the yeast, which is crucial for making your Garlic Herb Bread rise beautifully. In a medium bowl, combine 1 cup of warm water with 1 tablespoon of sugar and 2 teaspoons of active dry yeast. Stir gently to dissolve the yeast. Let this mixture sit for about 5-10 minutes until it becomes frothy. This step ensures that the yeast is alive and working effectively, which is essential for a well-risen loaf.
Step 2: Mix the Dry Ingredients
While the yeast is activating, you can prepare your dry ingredients. In a large mixing bowl, combine 3 cups of all-purpose flour and 1 teaspoon of salt. Whisk them together until they are evenly mixed. This will help distribute the salt evenly throughout the flour, which is important for flavor.
Step 3: Forming the Dough
Once the yeast mixture is frothy, add it to the bowl of dry ingredients along with 1/4 cup of olive oil. Use a wooden spoon or your hands to mix the ingredients until a dough begins to form. You want to ensure that all of the flour is incorporated, and you should end up with a slightly sticky dough.
Step 4: Kneading the Dough
Transfer the dough onto a floured surface to knead it. Kneading is a critical step that helps develop the gluten, giving the bread its structure. Knead the dough for about 10 minutes, adding a little more flour if necessary to prevent sticking. The dough should become smooth and elastic by the end of this process.
Step 5: Incorporate Garlic and Herbs
In a small bowl, mix together 4 cloves of minced garlic, 2 tablespoons of chopped fresh parsley, 1 tablespoon of chopped fresh rosemary, and 1 tablespoon of chopped fresh thyme. Once your dough is kneaded, gently flatten it and spread the garlic and herb mixture over the surface. Fold the dough over itself and knead gently for a few more minutes to evenly incorporate the garlic and herbs throughout the dough.
Step 6: First Rise
After incorporating the garlic and herbs, place the dough in a greased bowl. Cover it with a clean kitchen towel or plastic wrap. Allow the dough to rise in a warm, draft-free area for about 1 hour, or until it has doubled in size. This is the first rise, which is essential for developing flavor and texture.
Step 7: Shape the Loaf
Once your dough has risen, punch it down gently to release any air bubbles. Turn it out onto a floured surface and shape it into a loaf. To do this, flatten the dough slightly and then roll it tightly into a cylinder. Pinch the seams to seal, ensuring that the garlic and herbs are well-distributed within the loaf.
Step 8: Second Rise
Place the shaped loaf into a greased baking pan. Cover it again with a kitchen towel and let it rise for another 30 minutes. This second rise will help the bread achieve a light and airy texture.
Step 9: Baking the Bread
Preheat your oven to 375°F (190°C). Once the second rise is complete, bake the loaf in the preheated oven for 25-30 minutes or until the top is golden brown and the bread sounds hollow when tapped on the bottom. Keep an eye on it to prevent over-baking.
Step 10: Cooling and Serving
After baking, remove the Garlic Herb Bread from the oven and let it cool in the pan for about 10 minutes. Then, transfer it to a wire rack to cool completely. Allowing the bread to cool before slicing will help maintain its structure and prevent it from becoming gummy. Once cooled, slice and serve your delicious Garlic Herb Bread to enjoy its rich flavor and aroma!
Why You’ll Love This Garlic Herb Bread
- Easy to Make: With simple ingredients and straightforward steps, even beginner bakers can create this delicious bread without any hassle.
- Packed with Flavor: The combination of garlic and fresh herbs infuses every bite with aromatic goodness, making it a standout side dish.
- Perfect for Meals: This bread pairs wonderfully with soups, salads, and pasta dishes, enhancing your dining experience.
- Great for Sharing: Garlic Herb Bread is ideal for gatherings and special occasions; its irresistible aroma and taste will have everyone coming back for more.
- Versatile for Different Occasions: Whether you’re enjoying it as a snack, serving it at a dinner party, or using it to complement a cozy meal, this bread fits any occasion perfectly.
🍴 Top Kitchen Essentials You’ll Love




Tips for Success with Garlic Herb Bread
To ensure your Garlic Herb Bread turns out perfectly every time, keep these pro tips in mind:
Ensure the Water Temperature is Right
When activating the yeast, the water should be warm but not hot. Ideally, it should be between 100°F and 110°F (37°C to 43°C). If the water is too hot, it can kill the yeast, preventing your bread from rising. Use a kitchen thermometer or test the water with your wrist to ensure it’s at the right temperature.
Knead Thoroughly
Kneading is crucial for developing the gluten in the dough, which gives the bread its structure and chewiness. Make sure to knead the dough for at least 10 minutes until it becomes smooth and elastic. If your dough is still sticky, add a little more flour as needed, but avoid adding too much, as it can make the bread dense.
Do Not Skip Resting Times
The resting times for both the first and second rise are essential for flavor development and texture. Allow the dough to rise in a warm area free from drafts, and be patient—rushing this process can lead to denser bread. If your kitchen is cool, consider placing the dough in an oven with just the light on to create a warm environment for rising.
Watch for Color and Sound When Baking
When baking the Garlic Herb Bread, keep an eye on its color. The crust should be a beautiful golden brown, and when you tap the bottom of the loaf, it should sound hollow. This is a good indicator that the bread is fully baked and ready to come out of the oven.
Experiment with Flavor
Feel free to customize the flavor of your Garlic Herb Bread by adding different herbs or spices. Consider incorporating ingredients like oregano, basil, or even parmesan cheese into the dough for a unique twist. Just keep the ratios similar to maintain the right texture.
Nutritional Information for Garlic Herb Bread
When it comes to enjoying delicious homemade Garlic Herb Bread, understanding its nutritional content can help you make informed choices. Below are the typical nutritional values for a serving size of 1 slice of this flavorful bread. Please note that these values are estimates and can vary based on specific ingredients used and portion sizes:
- Calories: 150
- Fat: 5g
- Saturated Fat: 1g
- Unsaturated Fat: 4g
- Trans Fat: 0g
- Cholesterol: 0mg
- Sodium: 200mg
- Carbohydrates: 23g
- Fiber: 1g
- Protein: 4g
- Sugar: 1g
This Garlic Herb Bread not only provides a delightful taste experience but also offers a comforting addition to your meals while being mindful of your dietary needs!
Storage & Reheating Instructions
To keep your Garlic Herb Bread fresh and delicious, it’s essential to store it properly. After the bread has completely cooled, wrap it tightly in plastic wrap or place it in an airtight container. This will help prevent it from drying out and maintain its soft texture. Stored this way, the bread can last for about 3-4 days at room temperature.
If you want to keep it for a longer period, consider freezing the bread. You can slice the loaf before freezing for convenience. Wrap each slice individually in plastic wrap, then place them in a freezer-safe bag or container. Garlic Herb Bread can be frozen for up to 3 months. When you’re ready to enjoy it, simply remove the desired number of slices and let them thaw at room temperature, or heat them in the oven.
To reheat your Garlic Herb Bread, preheat your oven to 350°F (175°C). Place the bread directly on the oven rack or on a baking sheet for about 10-15 minutes, or until warmed through. If you prefer a crispy crust, you can brush the top with a little melted butter or olive oil before reheating. Enjoy your freshly warmed Garlic Herb Bread just like it was made that day!
FAQ about Garlic Herb Bread
What If My Garlic Herb Bread Doesn’t Turn Out Right?
If you find that your Garlic Herb Bread hasn’t turned out as expected, don’t worry! Common issues include the bread being too dense or not rising properly. If the dough didn’t rise, it could be due to inactive yeast, often caused by water that was too hot or too cold. Always check the expiration date of your yeast and ensure the water temperature is within the ideal range of 100°F to 110°F. If the bread is dense, it may have been over-kneaded or too much flour was added during preparation. Remember, baking is a learning process, and each attempt will help you improve!
Can I Prepare This in Advance?
Yes, you can prepare Garlic Herb Bread in advance! The dough can be made ahead of time and stored in the refrigerator for up to 24 hours before the first rise. Just be sure to cover it tightly with plastic wrap. When you’re ready to bake, remove it from the fridge and let it come to room temperature, then proceed with shaping and rising as per the recipe. Alternatively, you can bake the bread ahead of time, let it cool completely, and store it in an airtight container or freeze it. This way, you can have freshly baked bread ready whenever needed!
What Ingredients Can I Swap?
If you have dietary restrictions or personal preferences, there are several substitutions you can make for Garlic Herb Bread. For a gluten-free version, use a 1:1 gluten-free flour blend instead of all-purpose flour. You can also swap out the olive oil for melted butter if you prefer a richer flavor. If you want to skip the garlic, try adding caramelized onions or sun-dried tomatoes for a different twist. Fresh herbs can be replaced with dried herbs—just use about one-third of the amount. Feel free to get creative and tailor the recipe to your taste!
Print
Garlic Herb Bread
- Total Time: 1 hour 15 minutes
- Yield: 1 loaf 1x
- Diet: Vegetarian
Description
Garlic Herb Bread is a flavorful and aromatic bread infused with garlic and fresh herbs.
Ingredients
- 3 cups all-purpose flour
- 1 tablespoon sugar
- 1 teaspoon salt
- 2 teaspoons active dry yeast
- 1 cup warm water
- 1/4 cup olive oil
- 4 cloves garlic, minced
- 2 tablespoons fresh parsley, chopped
- 1 tablespoon fresh rosemary, chopped
- 1 tablespoon fresh thyme, chopped
Instructions
- In a bowl, combine warm water, sugar, and yeast. Let it sit for 5 minutes until frothy.
- In a large mixing bowl, combine flour and salt.
- Add the yeast mixture and olive oil to the flour. Mix until a dough forms.
- Knead the dough on a floured surface for about 10 minutes until smooth.
- In a small bowl, mix garlic and herbs. Incorporate into the dough.
- Place the dough in a greased bowl, cover, and let rise for 1 hour.
- Punch down the dough and shape it into a loaf.
- Place the loaf in a greased baking pan and let it rise for another 30 minutes.
- Bake in a preheated oven at 375°F (190°C) for 25-30 minutes until golden brown.
- Let cool before slicing and serving.
Notes
- For extra flavor, brush the top with melted butter before baking.
- Store leftover bread in an airtight container.
- Can be frozen for up to 3 months.
- Prep Time: 15 minutes
- Cook Time: 30 minutes
- Category: Bread
- Method: Baking
- Cuisine: Italian
Nutrition
- Serving Size: 1 slice
- Calories: 150
- Sugar: 1g
- Sodium: 200mg
- Fat: 5g
- Saturated Fat: 1g
- Unsaturated Fat: 4g
- Trans Fat: 0g
- Carbohydrates: 23g
- Fiber: 1g
- Protein: 4g
- Cholesterol: 0mg
Keywords: Garlic Herb Bread, homemade bread, garlic bread