

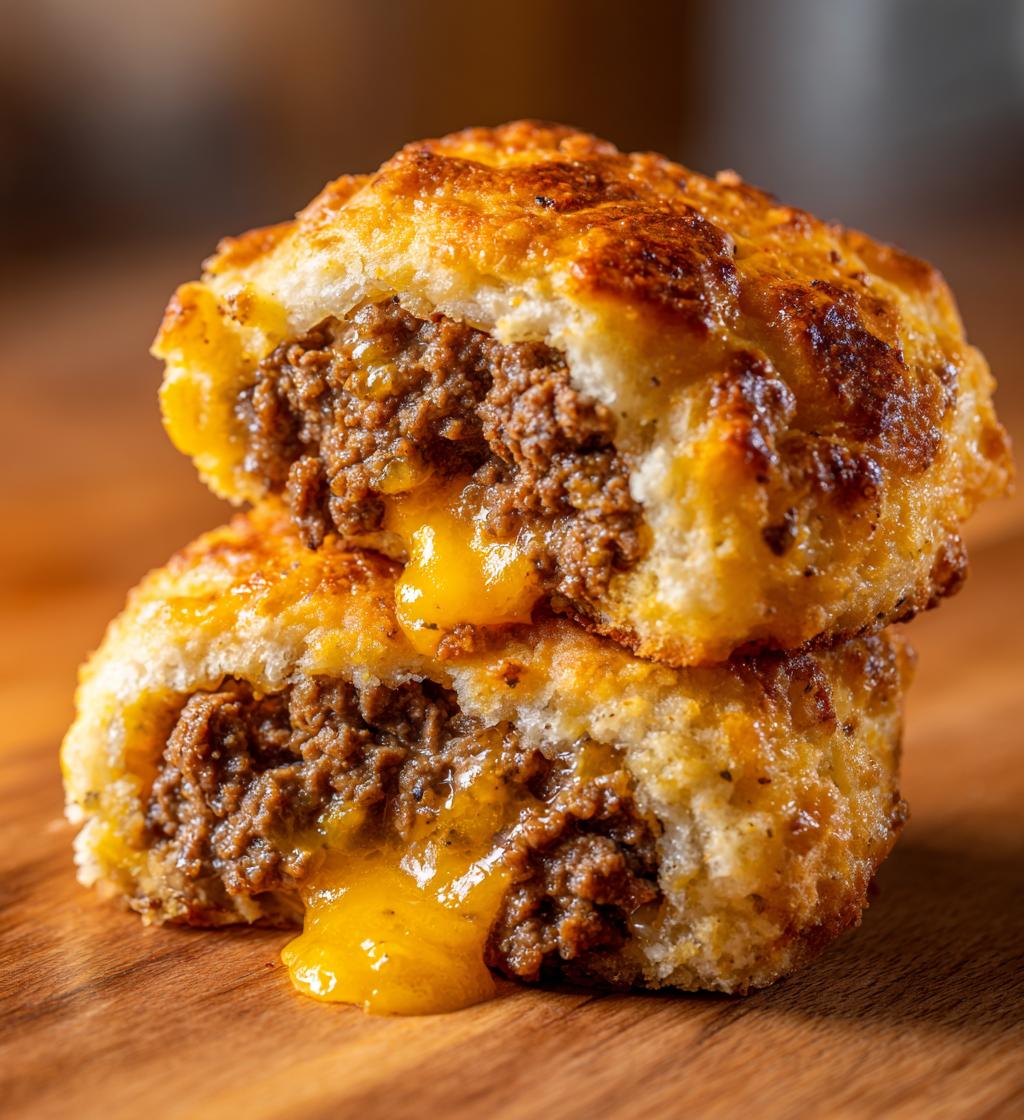
Are you ready to indulge in a mouthwatering treat that combines the best of both worlds—juicy cheeseburgers and delectable garlic flavor? Garlic Cheeseburger Bombs are the perfect bite-sized snacks that will have your taste buds dancing with delight. Imagine sinking your teeth into a warm, fluffy dough that encases a savory filling of seasoned ground beef, melted cheddar cheese, and a hint of garlic that lingers on your palate. It’s a flavor explosion that is simply irresistible!
I still remember the first time I tasted these delicious bombs at a friends’ gathering. The aroma wafting from the oven drew everyone in, and as soon as they came out, they disappeared in a flash. There’s just something about the combination of gooey cheese and seasoned beef that makes them a hit with both kids and adults alike. Whether you’re hosting a game night, a casual get-together, or simply craving a tasty snack, Garlic Cheeseburger Bombs are sure to impress. Let’s dive into the recipe and bring this scrumptious delight to your kitchen!
Ingredients List
To make the delicious Garlic Cheeseburger Bombs, you will need the following ingredients:
- 1 lb ground beef
- 1 cup shredded cheddar cheese
- 1 clove garlic, minced
- 1 tsp onion powder
- 1 tsp salt
- 1/2 tsp black pepper
- 1 can refrigerated biscuit dough
- 1 egg, beaten (for egg wash)
Make sure to prepare the garlic by mincing it finely and shred the cheddar cheese to ensure it melts perfectly within the bombs. These ingredients come together to create a flavor-packed treat that everyone will love!
How to Prepare Garlic Cheeseburger Bombs
Preparing Garlic Cheeseburger Bombs is a fun and straightforward process that will have you enjoying these savory treats in no time! Follow these simple steps to create a delicious appetizer that everyone will love.
Step-by-Step Instructions
Preheat and Prepare
Start by preheating your oven to 375°F (190°C). This ensures that the Garlic Cheeseburger Bombs will bake evenly and achieve a golden-brown finish. While the oven is heating up, prepare your skillet over medium heat. This is where you will cook the ground beef.
Cook the Beef Mixture
Add the ground beef to the heated skillet and cook, breaking it apart with a spatula, until it is browned and fully cooked, which should take about 5-7 minutes. Once cooked, drain any excess fat from the skillet. Next, stir in the minced garlic, onion powder, salt, and black pepper. Mix well and cook for an additional minute, allowing the flavors to meld. Remove the skillet from the heat and stir in the shredded cheddar cheese until it is melted and well combined with the beef mixture.
Assemble the Bombs
Open the can of refrigerated biscuit dough and separate it into individual biscuits. On a clean surface, flatten each biscuit into a circle using your hands or a rolling pin. Place a generous spoonful of the beef and cheese mixture in the center of each biscuit. Carefully fold the dough over the filling and pinch the edges to seal securely, ensuring that the filling is fully enclosed. This step is crucial to keep the cheesy goodness inside during baking.
Baking Instructions
Line a baking sheet with parchment paper and place the assembled Garlic Cheeseburger Bombs on it, seam side down. Brush the tops of the bombs with a beaten egg to give them a beautiful golden color as they bake. Place the baking sheet in the preheated oven and bake for 15-20 minutes, or until the bombs are puffed and golden brown. Once done, remove them from the oven and let cool slightly before serving. Enjoy your delicious Garlic Cheeseburger Bombs warm!
Why You’ll Love This Recipe
- Quick to Prepare: These Garlic Cheeseburger Bombs can be made in just 35 minutes, making them a perfect choice for busy weeknights or last-minute gatherings.
- Great for Parties: Their bite-sized nature makes them an ideal appetizer for any party or game night, ensuring they’ll be a hit with your guests.
- Customizable Fillings: Feel free to get creative! You can easily swap out the beef for turkey or chicken, and experiment with different cheeses or spices to suit your taste.
- Delicious Flavor: The combination of juicy beef, melted cheese, and aromatic garlic wrapped in soft dough guarantees a flavor explosion in every bite.
🍴 Top Kitchen Essentials You’ll Love




Tips for Success
To ensure your Garlic Cheeseburger Bombs turn out perfectly every time, consider the following pro tips:
- Don’t Overcook the Beef: Make sure to cook the ground beef just until it’s browned. Overcooking can lead to dry filling, which detracts from the overall flavor and texture of the bombs.
- Season Generously: Feel free to add more seasonings to the beef mixture based on your preference. A dash of cayenne pepper or some Worcestershire sauce can add an extra kick of flavor.
- Experiment with Cheeses: While cheddar cheese is a classic choice, you can mix things up by trying other cheeses like pepper jack for a spicy twist, or mozzarella for a milder, gooey texture.
- Chill the Filling: If you’re having trouble sealing the bombs, chilling the beef and cheese mixture for a short time can help it firm up, making it easier to handle.
- Brush for Extra Shine: For an added touch, sprinkle some garlic powder or dried herbs on top of the bombs after brushing with egg wash. This will enhance the flavor and make them visually appealing.
Storage & Reheating Instructions
Proper storage and reheating are key to enjoying your Garlic Cheeseburger Bombs even after the initial bake. Follow these tips to keep them fresh and delicious!
Best Storage Methods
Once your Garlic Cheeseburger Bombs have cooled completely, transfer them to an airtight container. You can keep them in the refrigerator for up to 3 days. If you want to store them for a longer period, consider freezing them. To do this, place the bombs on a baking sheet in a single layer and freeze until solid. Once frozen, transfer them to a freezer-safe bag or container, where they can be stored for up to 2 months. Label the container with the date for your reference.
Reheating Tips
When you’re ready to enjoy your leftover Garlic Cheeseburger Bombs, reheating them properly is essential to maintain their texture and flavor. If reheating from the refrigerator, preheat your oven to 350°F (175°C). Place the bombs on a baking sheet and heat for about 10-15 minutes, or until they are warmed through. For frozen bombs, there’s no need to thaw; just increase the reheating time to 20-25 minutes, checking to ensure they are heated all the way through.
If you’re short on time, you can also reheat them in the microwave, but keep in mind that this method may result in a softer dough. Microwave on a microwave-safe plate for about 30 seconds to 1 minute, or until heated to your liking. However, for the best texture, oven reheating is recommended.
Nutritional Information Disclaimer
Please note that the nutritional values for Garlic Cheeseburger Bombs may vary based on the specific ingredients and brands used in the recipe. The following values are estimates based on standard ingredients:
- Serving Size: 1 bomb
- Calories: 200
- Sugar: 1g
- Sodium: 450mg
- Fat: 12g
- Saturated Fat: 5g
- Unsaturated Fat: 5g
- Trans Fat: 0g
- Carbohydrates: 15g
- Fiber: 1g
- Protein: 10g
- Cholesterol: 30mg
For personalized nutritional information, please consult a registered dietitian or use a nutritional calculator based on the specific products you choose.
FAQ Section
What If My Garlic Cheeseburger Bombs Don’t Turn Out Right?
If your Garlic Cheeseburger Bombs don’t turn out as expected, don’t be discouraged! Common issues include undercooked dough or a filling that leaks out. To avoid these problems, ensure that you seal the dough tightly around the filling. If the bombs are undercooked, simply return them to the oven for a few more minutes until golden brown and fully cooked through. Remember, practice makes perfect!
Can I Prepare This in Advance?
Yes! You can prepare Garlic Cheeseburger Bombs in advance. Assemble the bombs and place them in an airtight container in the refrigerator for up to 24 hours before baking. Alternatively, you can freeze them unbaked. Just make sure to separate them on a baking sheet until frozen, then transfer to a freezer-safe bag. When you’re ready to bake, you can cook them directly from frozen; just add a few extra minutes to the baking time.
What Ingredients Can I Swap?
There are several substitutions you can make for Garlic Cheeseburger Bombs. For instance, you can use ground turkey or chicken instead of beef for a leaner option. If you’re looking for a vegetarian version, try using a mixture of sautéed mushrooms, black beans, or lentils as the filling. Additionally, you can swap cheddar cheese for mozzarella or pepper jack for a spicier kick. Just be sure to adjust seasonings accordingly to maintain flavor.
How Do I Serve Garlic Cheeseburger Bombs?
Garlic Cheeseburger Bombs are best served warm. To enhance their flavor, consider serving them with a variety of dipping sauces like ketchup, mustard, or ranch dressing. For a fun twist, you can also serve them with spicy aioli or garlic butter. Arrange them on a platter for parties and gatherings, and watch them disappear!
Can I Make Garlic Cheeseburger Bombs Gluten-Free?
Absolutely! To make Garlic Cheeseburger Bombs gluten-free, simply substitute the refrigerated biscuit dough with a gluten-free biscuit mix or recipe. You can also use gluten-free wraps or puff pastry if available. Just make sure to check all the ingredients, especially the seasoning mixes, for any gluten-containing products.
Print
Garlic Cheeseburger Bombs
- Total Time: 35 minutes
- Yield: 12 servings 1x
- Diet: None
Description
Garlic Cheeseburger Bombs are delicious bite-sized treats filled with juicy beef, melted cheese, and a hint of garlic, all wrapped in a soft dough.
Ingredients
- 1 lb ground beef
- 1 cup shredded cheddar cheese
- 1 clove garlic, minced
- 1 tsp onion powder
- 1 tsp salt
- 1/2 tsp black pepper
- 1 can refrigerated biscuit dough
- 1 egg, beaten (for egg wash)
Instructions
- Preheat the oven to 375°F (190°C).
- In a skillet, cook the ground beef over medium heat until browned. Drain excess fat.
- Add minced garlic, onion powder, salt, and black pepper to the beef. Mix well and remove from heat.
- Stir in shredded cheddar cheese until melted.
- Open the biscuit dough and separate it into individual biscuits.
- Flatten each biscuit into a circle and place a spoonful of the beef mixture in the center.
- Fold the dough over the filling and pinch to seal.
- Place the bombs on a baking sheet lined with parchment paper.
- Brush the tops with beaten egg.
- Bake for 15-20 minutes or until golden brown.
- Let cool slightly before serving.
Notes
- For extra flavor, add your favorite seasonings to the beef mixture.
- Serve with dipping sauces like ketchup or mustard.
- Prep Time: 15 minutes
- Cook Time: 20 minutes
- Category: Appetizer
- Method: Baking
- Cuisine: American
Nutrition
- Serving Size: 1 bomb
- Calories: 200
- Sugar: 1g
- Sodium: 450mg
- Fat: 12g
- Saturated Fat: 5g
- Unsaturated Fat: 5g
- Trans Fat: 0g
- Carbohydrates: 15g
- Fiber: 1g
- Protein: 10g
- Cholesterol: 30mg
Keywords: Garlic Cheeseburger Bombs, cheeseburger, appetizer, beef, cheese