

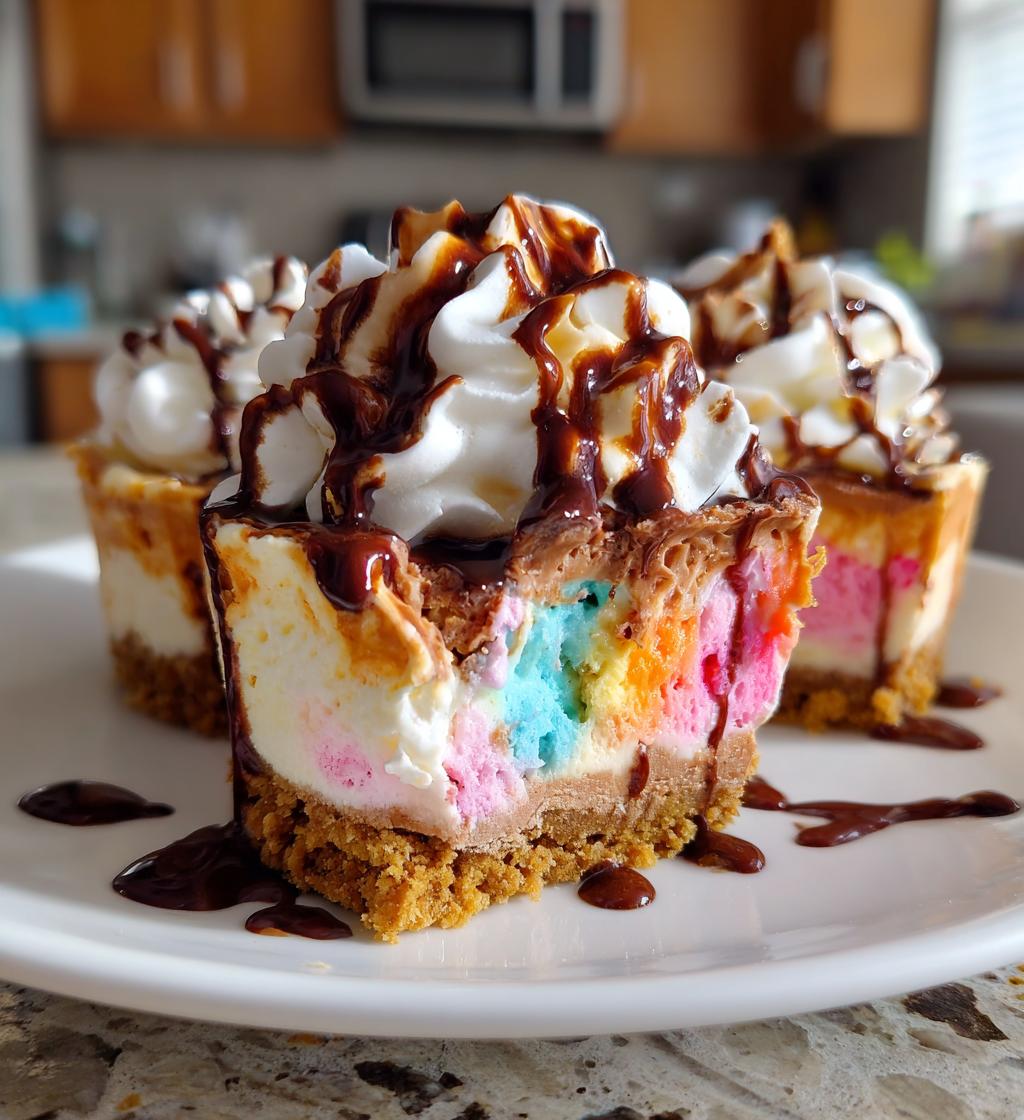
There’s something truly special about whipping up a delightful dessert that requires minimal effort, and these Easy No-Bake Mini Ice Cream Cakes are the perfect example. Imagine a warm summer day, and instead of spending hours in the kitchen baking, you can create a stunning dessert that will impress your friends and family in just a fraction of the time. The joy of making these mini ice cream cakes lies not only in their simplicity but also in their versatility; you can customize them with your favorite ice cream flavors and toppings.
Whether you’re hosting a birthday party, a casual get-together, or simply treating yourself, these Easy No-Bake Mini Ice Cream Cakes are a guaranteed crowd-pleaser. Each bite is a delightful blend of creamy ice cream, crunchy graham cracker crust, and fluffy whipped cream, drizzled with your choice of chocolate or caramel sauce. Plus, they can be made ahead of time and stored in the freezer, making them a convenient option for any occasion. So, let’s dive into this easy recipe and create a dessert that will bring smiles to everyone’s faces!
Ingredients List
- 2 cups crushed graham crackers: These form the crunchy base of your mini ice cream cakes.
- 1/2 cup melted butter: This helps bind the graham cracker crumbs together for the crust.
- 4 cups ice cream: Choose your favorite flavor or a combination for a delightful treat.
- 1 cup whipped cream: This lightens up the texture and adds a creamy layer on top.
- Chocolate or caramel sauce: For drizzling on top before serving, adding extra sweetness and flavor.
How to Prepare Easy No-Bake Mini Ice Cream Cakes
Making these Easy No-Bake Mini Ice Cream Cakes is a breeze! Follow these simple steps to create a delightful dessert that everyone will love:
Step 1: Prepare the Crust
In a mixing bowl, combine 2 cups of crushed graham crackers with 1/2 cup of melted butter. Stir until the mixture is well combined and resembles wet sand. This will form the base of your mini ice cream cakes.
Step 2: Press the Crust into the Pans
Take your mini cake pans and evenly distribute the graham cracker mixture into the bottom of each pan. Use the back of a spoon or your fingers to press down firmly, ensuring the crust is compact and holds together well.
Step 3: Add the Ice Cream Layer
Next, scoop 4 cups of your favorite ice cream onto the crust in each mini cake pan. Use a spatula to spread the ice cream evenly over the crust. You can choose one flavor or mix different flavors for a fun twist!
Step 4: Top with Whipped Cream
Once the ice cream layer is smooth, add a generous layer of whipped cream (about 1 cup total) on top of the ice cream. Spread it out evenly to create a fluffy, creamy layer that complements the ice cream.
Step 5: Freeze the Mini Cakes
Cover the mini cake pans with plastic wrap and place them in the freezer. Allow the cakes to freeze for at least 4 hours, or until they are completely solid. This step is crucial for achieving the perfect texture and ensuring that the cakes hold their shape when served.
Step 6: Serve and Enjoy!
When you’re ready to serve, remove the mini ice cream cakes from the freezer. Let them sit at room temperature for a few minutes to soften slightly for easier slicing. Drizzle with chocolate or caramel sauce before serving for an extra touch of sweetness. Enjoy your delicious Easy No-Bake Mini Ice Cream Cakes!
Why You’ll Love This Recipe
- Effortless Preparation: With no baking required, you can whip up these mini ice cream cakes in no time.
- Customizable Flavors: Use your favorite ice cream flavors to create a uniquely delicious treat for everyone.
- Crowd-Pleasing Dessert: Perfect for parties, gatherings, or just a sweet indulgence, these cakes are sure to impress.
- Make-Ahead Convenience: Prepare in advance and store in the freezer, making entertaining a breeze.
- Fun for All Ages: Kids and adults alike will love these delightful mini desserts!
🍴 Top Kitchen Essentials You’ll Love




Tips for Success
To ensure your Easy No-Bake Mini Ice Cream Cakes turn out perfectly every time, consider the following tips:
Choose Quality Ingredients
Using high-quality ice cream will significantly enhance the flavor of your mini cakes. Opt for premium brands or artisanal ice cream for a richer taste. Additionally, make sure your whipped cream is fresh, as this will contribute to the overall texture and enjoyment of the dessert.
Press the Crust Firmly
When creating the crust, be sure to press the graham cracker mixture down firmly into the mini cake pans. This will help the crust maintain its shape when slicing and serving. A compact crust will hold up better against the creamy layers on top.
Freeze Thoroughly
Allow your mini ice cream cakes to freeze for at least 4 hours, or longer if possible. The longer freezing time helps the layers set properly and ensures a smooth, easy slicing experience. If you’re in a hurry, consider freezing them overnight for best results.
Serve at the Right Temperature
Before serving, let the cakes sit at room temperature for a few minutes. This will soften them slightly, making it easier to slice through the layers. A warm knife can also help achieve clean cuts for a beautiful presentation.
Experiment with Toppings
Don’t hesitate to get creative with toppings! Alongside chocolate or caramel sauce, consider adding sprinkles, crushed nuts, or fresh fruit for extra texture and flavor. Personalizing your mini ice cream cakes will make them even more delightful!
Variations
One of the best aspects of these Easy No-Bake Mini Ice Cream Cakes is their versatility. Here are some fun ideas to switch things up:
Different Ice Cream Flavors
Don’t be afraid to experiment with various ice cream flavors! From classic vanilla and rich chocolate to fruity strawberry or cookies and cream, the possibilities are endless. You can even layer different flavors within the same cake for a delightful surprise in every bite.
Creative Toppings
In addition to chocolate or caramel sauce, consider adding toppings such as crushed Oreos, mini chocolate chips, fresh berries, or a sprinkle of coconut. You can also drizzle some peanut butter or fudge sauce for an indulgent twist. The choice of toppings can elevate the presentation and flavor profile of your mini cakes.
Seasonal Variations
Take advantage of seasonal flavors by incorporating pumpkin spice ice cream in the fall or peppermint ice cream during the winter holidays. These seasonal variations can make your Easy No-Bake Mini Ice Cream Cakes a festive treat for any occasion!
Nutritional Information Section
When it comes to indulging in these Easy No-Bake Mini Ice Cream Cakes, it’s important to be aware of the nutritional content. Please note that the nutritional values can vary significantly based on the specific ingredients and brands you choose to use. The following estimates are based on a standard recipe:
- Calories: 250
- Fat: 14g
- Saturated Fat: 8g
- Trans Fat: 0g
- Cholesterol: 30mg
- Sodium: 150mg
- Carbohydrates: 30g
- Fiber: 1g
- Sugar: 18g
- Protein: 3g
For the most accurate nutritional information, please calculate based on your specific ingredients and serving sizes. Enjoy your delicious creations while being mindful of these values!
FAQ Section
What If My Easy No-Bake Mini Ice Cream Cakes Don’t Turn Out Right?
If your mini ice cream cakes don’t set properly, it may be due to insufficient freezing time. Ensure you freeze them for at least 4 hours or until completely solid. If they are too hard when serving, let them sit at room temperature for a few minutes before slicing. If they’re too soft, you may need to freeze them longer next time.
Can I Prepare This in Advance?
Absolutely! These Easy No-Bake Mini Ice Cream Cakes are perfect for making ahead of time. You can prepare them a day or two in advance, store them in the freezer, and pull them out when you’re ready to serve. Just remember to let them soften slightly before slicing for easier serving.
What Ingredients Can I Swap?
You can easily customize your Easy No-Bake Mini Ice Cream Cakes based on your preferences or dietary needs. For a gluten-free option, use gluten-free graham crackers. You can also substitute dairy ice cream with a dairy-free version to make it vegan. Additionally, feel free to swap out the whipped cream for a non-dairy alternative if desired.
How Long Do These Mini Cakes Last in the Freezer?
When stored properly in an airtight container or wrapped tightly, your Easy No-Bake Mini Ice Cream Cakes can last in the freezer for up to 2 weeks. Just be sure to label them with the date so you can enjoy them at their best quality!
What Are Some Serving Suggestions for Easy No-Bake Mini Ice Cream Cakes?
For an impressive presentation, drizzle chocolate or caramel sauce on top before serving. You can also garnish with fresh berries, crushed nuts, or sprinkles for added texture and flavor. These mini cakes are delightful on their own but can be paired with a scoop of extra ice cream or a dollop of whipped cream for an indulgent treat!
Storage & Reheating Instructions
To store your Easy No-Bake Mini Ice Cream Cakes, make sure they are well-covered to prevent freezer burn. You can wrap each mini cake in plastic wrap or place them in an airtight container. They will keep well in the freezer for up to 2 weeks.
When you’re ready to enjoy your mini cakes, simply remove them from the freezer and let them sit at room temperature for about 5-10 minutes. This will allow them to soften slightly, making it easier to slice. If you prefer, you can also microwave them for about 10-15 seconds to warm them up just enough to achieve the perfect texture for serving. Enjoy your delicious dessert!
Print
Easy No-Bake Mini Ice Cream Cakes
- Total Time: 4 hours 20 minutes
- Yield: 12 mini cakes 1x
- Diet: Vegetarian
Description
A simple and delicious recipe for mini ice cream cakes that require no baking.
Ingredients
- 2 cups crushed graham crackers
- 1/2 cup melted butter
- 4 cups ice cream (your choice of flavor)
- 1 cup whipped cream
- Chocolate or caramel sauce for drizzling
Instructions
- Combine crushed graham crackers and melted butter in a bowl.
- Press the mixture into the bottom of mini cake pans.
- Scoop ice cream onto the crust and spread evenly.
- Add a layer of whipped cream on top of the ice cream.
- Freeze for at least 4 hours or until solid.
- Drizzle with chocolate or caramel sauce before serving.
Notes
- Use any flavor of ice cream you prefer.
- Let the cakes sit at room temperature for a few minutes before serving for easier slicing.
- Prep Time: 20 minutes
- Cook Time: 0 minutes
- Category: Dessert
- Method: No-Bake
- Cuisine: American
Nutrition
- Serving Size: 1 mini cake
- Calories: 250
- Sugar: 18g
- Sodium: 150mg
- Fat: 14g
- Saturated Fat: 8g
- Unsaturated Fat: 4g
- Trans Fat: 0g
- Carbohydrates: 30g
- Fiber: 1g
- Protein: 3g
- Cholesterol: 30mg
Keywords: Easy No-Bake Mini Ice Cream Cakes