

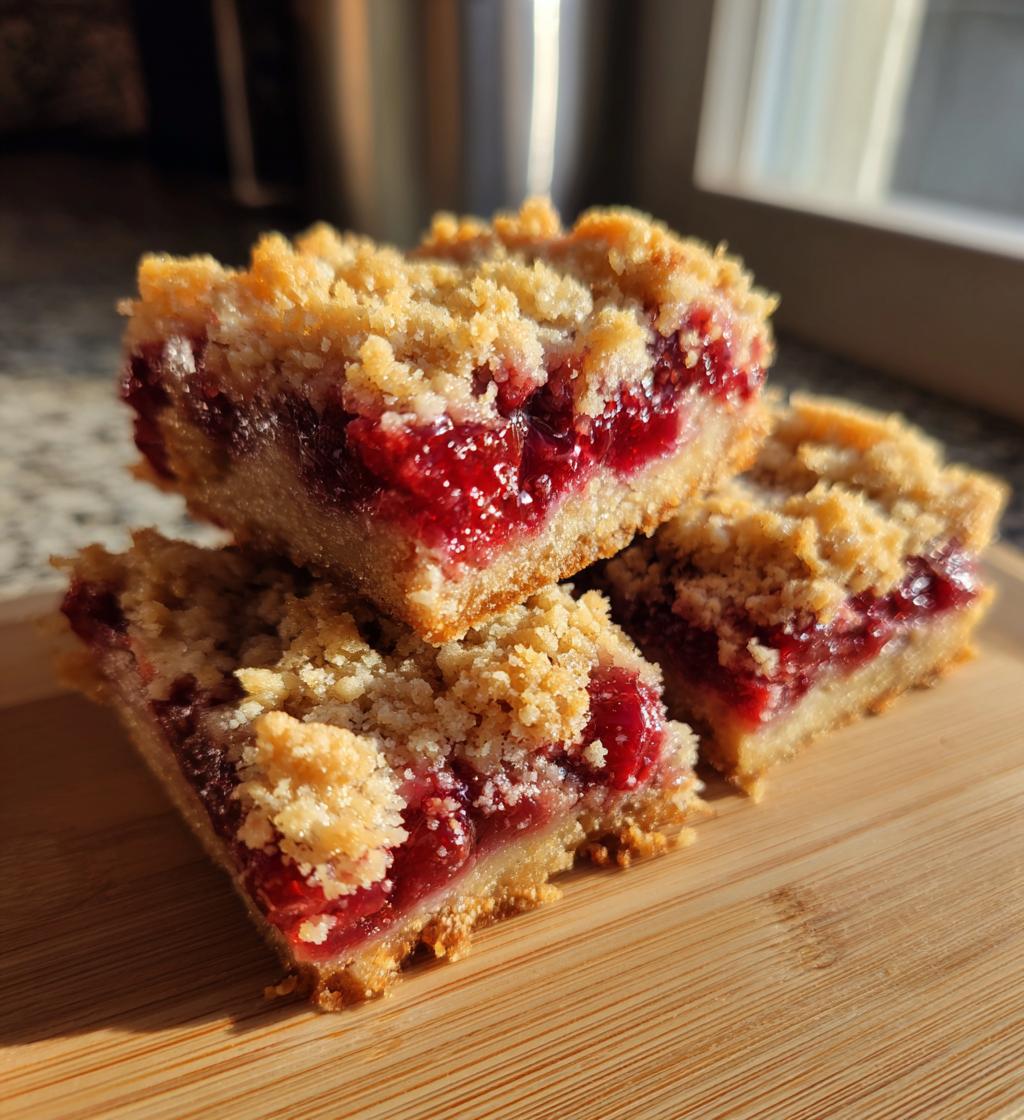
There’s something undeniably delightful about biting into a warm, sweet Easy Cherry Pie Bar. With their buttery crust and luscious cherry filling, these bars are a perfect dessert for any occasion. Whether you’re planning a family gathering, a picnic, or simply indulging in a treat after dinner, Easy Cherry Pie Bars deliver flavor and satisfaction in every bite. As someone who enjoys baking, I appreciate recipes that are simple yet delicious, and this one is no exception. It requires minimal effort and time, allowing even novice bakers to create a stunning dessert that feels special.

Not only are Easy Cherry Pie Bars a crowd-pleaser, but they also offer a versatile base for creativity. You can easily swap in different fruit fillings or add your favorite toppings like whipped cream or nuts. It’s a joy to see the smiles on friends and family as they enjoy a slice of this sweet treat. Join me as we explore how to make these delightful bars, ensuring that you too can share in the joy of baking something that everyone will love!
Why You’ll Love This Recipe
- Quick Preparation: Easy Cherry Pie Bars come together in just about 15 minutes of prep time, making them a perfect last-minute dessert option.
- Delicious Flavor: The combination of a buttery crust and sweet cherry filling creates a delightful balance that satisfies any sweet tooth.
- Versatility: While this recipe features cherry filling, you can easily swap in your favorite fruit fillings or toppings to customize the bars to your liking.
- Perfect for Any Occasion: Whether it’s a family gathering, picnic, or simply a treat at home, these bars fit seamlessly into any event.
- Easy to Slice and Serve: The bar format makes them easy to cut into portions, perfect for sharing with friends and family.
Ingredients for Easy Cherry Pie Bars
- 1 cup all-purpose flour
- 1/2 cup granulated sugar
- 1/4 cup unsalted butter, softened
- 1/4 teaspoon salt
- 1/2 teaspoon vanilla extract
- 1 can (21 oz) cherry pie filling
- 1 tablespoon cornstarch
How to Prepare Easy Cherry Pie Bars
Preheat the Oven
Start by preheating your oven to 350°F (175°C). Preheating is a crucial step in baking as it ensures that your Easy Cherry Pie Bars cook evenly and achieve the desired texture. An adequately heated oven helps the crust rise and become perfectly golden brown, providing a delicious base for the cherry filling.
Prepare the Crust
In a mixing bowl, combine 1 cup of all-purpose flour, 1/2 cup of granulated sugar, 1/4 cup of softened unsalted butter, 1/4 teaspoon of salt, and 1/2 teaspoon of vanilla extract. Use a fork or your fingers to mix the ingredients until the mixture resembles coarse crumbs. This step is essential as it creates the buttery crust for your bars. Once crumbly, take half of this mixture and press it firmly into the bottom of a greased baking dish, creating an even layer. This forms the base layer that will hold your delicious cherry filling.
Prepare the Cherry Filling
In a separate bowl, pour in the contents of the 21 oz can of cherry pie filling. To thicken the filling and prevent it from becoming too runny, sprinkle in 1 tablespoon of cornstarch and gently mix until well combined. This step is vital because the cornstarch helps to set the filling as the bars bake, ensuring that each slice holds its shape. The sweet cherry mixture is now ready to be layered onto the crust.
Assemble the Bars
Once your crust is prepared and the cherry filling is mixed, it’s time to assemble your Easy Cherry Pie Bars. Spread the cherry filling evenly over the crust layer in the baking dish. Afterward, take the remaining crumb mixture and sprinkle it generously on top of the cherry filling. This layer will create a delightful topping that adds texture and sweetness to your bars. Make sure to cover the filling completely for an even bake.
Bake and Cool
Place your assembled bars in the preheated oven and bake for 25-30 minutes, or until the top is golden brown and the filling is bubbly. Once baked, remove the dish from the oven and allow the bars to cool in the pan for at least 10-15 minutes. This cooling period is essential, as it helps the filling set further and makes slicing easier. After cooling, you can cut the Easy Cherry Pie Bars into squares or rectangles and serve them warm or at room temperature.
🍴 Top Kitchen Essentials You’ll Love




Tips for Success
To ensure your Easy Cherry Pie Bars turn out perfectly every time, consider these practical tips and suggestions:
Choose the Right Ingredients
Using high-quality ingredients can make a noticeable difference in flavor. Opt for fresh, high-quality cherry pie filling or even homemade if you’re feeling adventurous. If you prefer a healthier option, consider using a sugar substitute in the crust.
Don’t Overmix the Crust
When preparing the crust, mix the ingredients just until they resemble coarse crumbs. Overmixing can lead to a tough texture, which is not ideal for these bars. Aim for a light and crumbly consistency for a buttery and tender crust.
Experiment with Flavors
Feel free to get creative with your Easy Cherry Pie Bars! Experiment with different fruit fillings such as blueberry, peach, or apple. You can also add spices like cinnamon or nutmeg to the crust for an extra flavor boost.
Check for Doneness
Keep an eye on the baking time; ovens can vary. The top should be golden brown, and you should see the cherry filling bubbling slightly around the edges. If it’s not done after 30 minutes, continue baking and check every few minutes.
Proper Cooling
Allow the bars to cool completely in the pan before slicing. This helps the filling set up better, preventing it from spilling out when you cut into the bars. If you’re in a hurry, you can refrigerate the pan to speed up the cooling process.
Storage Tips
Store any leftovers in an airtight container at room temperature for up to 2 days or in the refrigerator for up to a week. If you want to keep them longer, consider freezing them. Just make sure to wrap them tightly in plastic wrap or foil before placing them in a freezer-safe container.
Nutritional Information
The following nutritional information for Easy Cherry Pie Bars is an estimate based on typical values and may vary depending on specific brands and ingredients used. Each bar contains approximately:
- Calories: 210
- Fat: 8g
- Saturated Fat: 5g
- Trans Fat: 0g
- Unsaturated Fat: 3g
- Cholesterol: 25mg
- Sodium: 150mg
- Carbohydrates: 33g
- Fiber: 1g
- Sugar: 15g
- Protein: 2g
This delicious dessert is not only sweet and satisfying but also offers a well-rounded treat for your taste buds. Enjoy your Easy Cherry Pie Bars without guilt, knowing they can fit into a balanced diet!
FAQ About Easy Cherry Pie Bars
What If My Easy Cherry Pie Bars Don’t Turn Out Right?
If your Easy Cherry Pie Bars don’t turn out as expected, don’t worry! Common issues include a soggy crust or runny filling. To prevent a soggy crust, ensure you press the crust mixture firmly into the baking dish and bake it until golden. If the filling is too runny, it may not have had enough time to set. Make sure to let the bars cool completely before slicing, as this helps the filling firm up.
Can I Prepare Easy Cherry Pie Bars in Advance?
Absolutely! You can prepare Easy Cherry Pie Bars a day in advance. Just bake them, let them cool completely, and store them in an airtight container at room temperature. If you want to make them even earlier, you can freeze the unbaked bars. Just assemble them and wrap tightly before freezing. When you’re ready to enjoy them, bake them straight from the freezer, adding a few extra minutes to the baking time.
What Ingredients Can I Swap in Easy Cherry Pie Bars?
There are several ingredients in Easy Cherry Pie Bars that you can swap based on your preferences or dietary needs. For instance, if you want a gluten-free option, you can use a gluten-free all-purpose flour blend. For a dairy-free version, substitute the unsalted butter with coconut oil or a dairy-free butter alternative. You can also replace the cherry pie filling with other fruit fillings like apple, blueberry, or mixed berries for a delicious twist.
How Long Do Easy Cherry Pie Bars Last?
When stored properly, Easy Cherry Pie Bars can last up to 2 days at room temperature or up to a week in the refrigerator. For longer storage, you can freeze them for up to 3 months. Just make sure they are wrapped well in plastic wrap or foil to maintain freshness.
Can I Add Toppings to Easy Cherry Pie Bars?
Yes! Toppings can enhance the flavor and presentation of your Easy Cherry Pie Bars. Consider serving them with a dollop of whipped cream, a scoop of vanilla ice cream, or a drizzle of chocolate sauce. You can also sprinkle some chopped nuts or a dusting of powdered sugar on top for added texture and visual appeal.
Storage & Reheating Instructions
To keep your Easy Cherry Pie Bars fresh and delicious, proper storage is essential. After allowing the bars to cool completely in the baking dish, transfer any leftovers to an airtight container. Store them at room temperature for up to 2 days. If you want to extend their shelf life, you can refrigerate them for up to a week.
If you decide to freeze your Easy Cherry Pie Bars, wrap them tightly in plastic wrap or foil before placing them in a freezer-safe container. This will help prevent freezer burn and maintain the quality of the bars. When stored this way, they can last for up to 3 months.
When you’re ready to enjoy your stored Easy Cherry Pie Bars, reheating is simple. If they are at room temperature, you can microwave them for about 10-15 seconds to warm them up. For refrigerated bars, preheat your oven to 350°F (175°C) and place the bars in an oven-safe dish, covering them with foil to prevent drying out. Heat for about 10-15 minutes until warmed through. Enjoy your Easy Cherry Pie Bars as if they were freshly baked!
Serving Suggestions
To elevate your dessert experience with Easy Cherry Pie Bars, consider these delightful serving suggestions:
Serve Warm with Whipped Cream
One of the best ways to enjoy Easy Cherry Pie Bars is to serve them warm, topped with a generous dollop of whipped cream. The lightness of the cream complements the rich cherry filling and buttery crust perfectly, creating a delicious contrast in textures. For an extra touch, you can sprinkle some grated chocolate or a drizzle of caramel sauce over the whipped cream for added flavor.
Ala Mode with Ice Cream
For a truly indulgent treat, serve your Easy Cherry Pie Bars with a scoop of vanilla ice cream. The cold, creamy ice cream pairs beautifully with the warm bars, making each bite a heavenly combination. You can also try different flavors such as almond or cinnamon ice cream to enhance the cherry flavor.
Garnish with Nuts and Chocolate
Adding a sprinkle of chopped nuts, such as almonds or walnuts, can give your Easy Cherry Pie Bars an extra crunch and depth of flavor. For chocolate lovers, consider drizzling melted chocolate over the top or adding chocolate chips to the cherry filling before baking. This added richness will make your dessert even more decadent.
Pair with Fresh Fruit
Enhance the freshness of your dessert by serving Easy Cherry Pie Bars alongside a side of fresh fruit. Slices of strawberries, blueberries, or a fruit salad can provide a refreshing contrast to the sweetness of the bars. This not only adds color to your presentation but also balances the rich flavors beautifully.
Enjoy with a Hot Beverage
For the perfect finishing touch, pair your Easy Cherry Pie Bars with a cup of coffee, tea, or hot chocolate. The warmth of your beverage will complement the sweet, fruity flavors of the bars, making it an ideal combination for afternoon tea or dessert after dinner.
Print
Easy Cherry Pie Bars
- Total Time: 45 minutes
- Yield: 8 bars 1x
- Diet: Vegetarian
Description
Easy Cherry Pie Bars are a simple dessert that combines a buttery crust with a sweet cherry filling.
Ingredients
- 1 cup all-purpose flour
- 1/2 cup granulated sugar
- 1/4 cup unsalted butter, softened
- 1/4 teaspoon salt
- 1/2 teaspoon vanilla extract
- 1 can (21 oz) cherry pie filling
- 1 tablespoon cornstarch
Instructions
- Preheat your oven to 350°F (175°C).
- In a bowl, mix flour, sugar, butter, salt, and vanilla until crumbly.
- Press half of the mixture into the bottom of a greased baking dish.
- In another bowl, combine cherry pie filling and cornstarch.
- Spread the cherry mixture over the crust in the baking dish.
- Sprinkle the remaining crumb mixture on top of the cherries.
- Bake for 25-30 minutes or until the top is golden brown.
- Let cool before slicing into bars.
🍴 Top Kitchen Essentials You’ll Love
Notes
- Serve with whipped cream for added flavor.
- Store leftovers in an airtight container.
- Can substitute cherry filling with other fruit fillings.
- Prep Time: 15 minutes
- Cook Time: 30 minutes
- Category: Dessert
- Method: Baking
- Cuisine: American
Nutrition
- Serving Size: 1 bar
- Calories: 210
- Sugar: 15g
- Sodium: 150mg
- Fat: 8g
- Saturated Fat: 5g
- Unsaturated Fat: 3g
- Trans Fat: 0g
- Carbohydrates: 33g
- Fiber: 1g
- Protein: 2g
- Cholesterol: 25mg
Keywords: Easy Cherry Pie Bars