

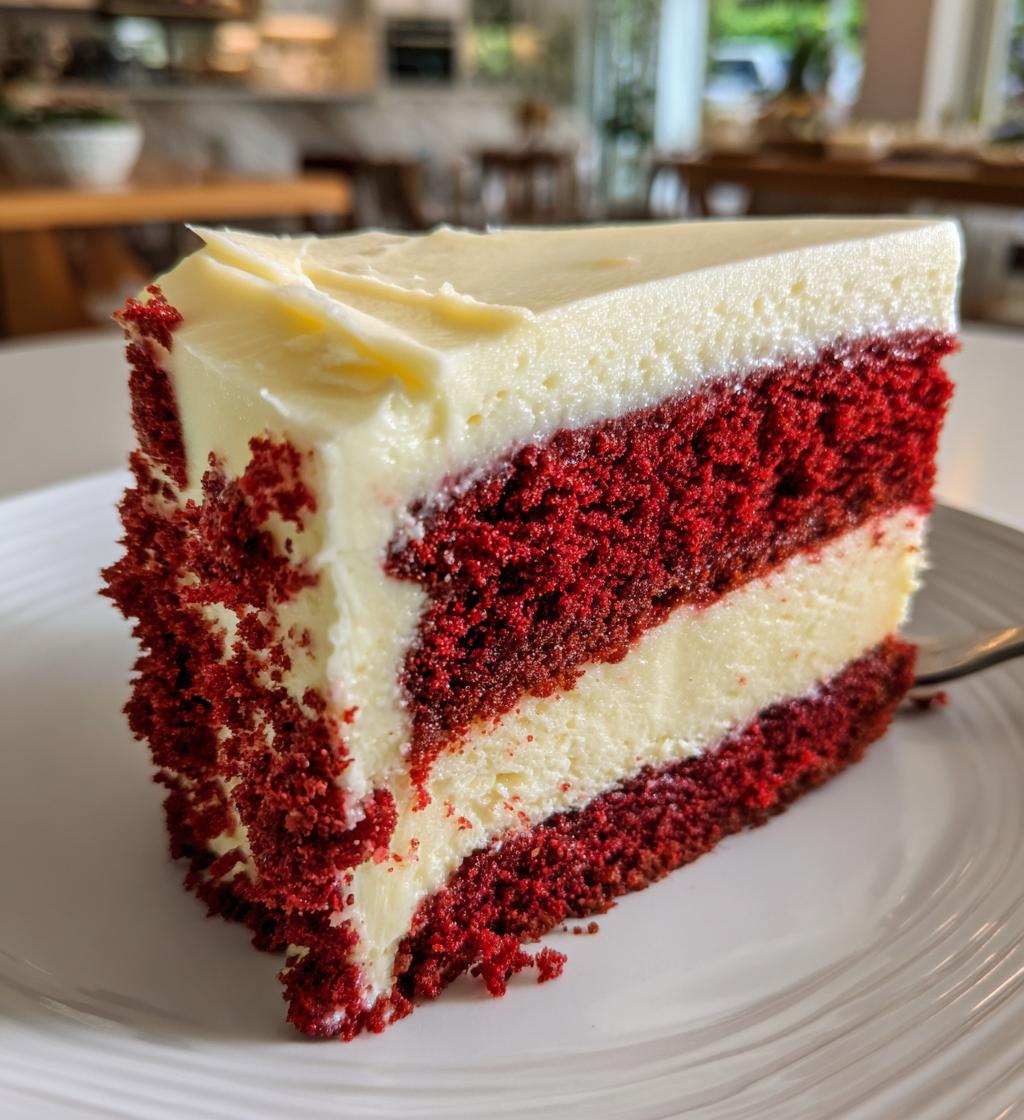
The holiday season is a time for joy, celebration, and of course, indulgent treats that bring friends and family together. One such delightful dessert that embodies the spirit of Christmas is the Christmas Red Velvet Cheesecake. This stunning dessert combines the rich, velvety texture of red velvet cake with the creamy indulgence of cheesecake, making it a showstopper at any holiday gathering. Its vibrant red hue not only captures the festive essence of the season but also adds a touch of elegance to your dessert table.
As someone who has cherished countless Christmas traditions, this cheesecake has become a personal favorite in my household. Every year, I look forward to baking it, as the aroma of baking cake fills the home and brings back memories of family gatherings, laughter, and love. This Christmas Red Velvet Cheesecake is not just a dessert; it’s a celebration of the season and a sweet way to create lasting memories with loved ones. So, let’s dive into this delightful recipe that is sure to impress your guests and make your holiday festivities even more special!
Ingredients List
To create a delicious Christmas Red Velvet Cheesecake, you’ll need the following ingredients:
- 2 cups all-purpose flour
- 1 ½ cups granulated sugar
- 1 teaspoon baking soda
- 1 teaspoon salt
- 1 cup vegetable oil
- 1 cup buttermilk
- 2 large eggs
- 2 tablespoons red food coloring
- 1 teaspoon vanilla extract
- 16 oz cream cheese, softened
- 1 cup powdered sugar
- 1 teaspoon vanilla extract
- 1 cup heavy cream
Make sure to gather all the ingredients before you start for a smooth baking experience! Each ingredient plays a crucial role in achieving the perfect balance of flavors and textures in your cheesecake.
How to Prepare Christmas Red Velvet Cheesecake
Preparing a Christmas Red Velvet Cheesecake is a delightful process that brings together the rich flavors of red velvet cake and the creaminess of cheesecake. Follow these step-by-step instructions to create a dessert that will impress everyone at your holiday gathering.
Preparing the Cake Base
Start by preheating your oven to 350°F (175°C). This step is crucial, as a well-preheated oven ensures even baking. In a large mixing bowl, combine 2 cups of all-purpose flour, 1 ½ cups of granulated sugar, 1 teaspoon of baking soda, and 1 teaspoon of salt. Whisk these dry ingredients together until well blended.
In another bowl, mix together 1 cup of vegetable oil, 1 cup of buttermilk, 2 large eggs, 2 tablespoons of red food coloring, and 1 teaspoon of vanilla extract. It’s important to ensure that the eggs and buttermilk are at room temperature for better emulsification. Once combined, gradually pour the wet mixture into the dry ingredients, mixing until just combined. Be careful not to overmix, as this can lead to a denser cake.
Next, pour the batter into a greased springform pan, smoothing the top with a spatula. Bake in the preheated oven for about 25-30 minutes or until a toothpick inserted into the center comes out clean. Keep an eye on the cake toward the end of the baking time to prevent overbaking.
Making the Cheesecake Layer
Once the cake has cooled completely, you can move on to preparing the cheesecake layer. In a large mixing bowl, beat 16 oz of softened cream cheese until it is smooth and creamy. Make sure the cream cheese is at room temperature; this will help it mix evenly without lumps. Gradually add 1 cup of powdered sugar, mixing until fully incorporated.
Next, add 1 teaspoon of vanilla extract and 1 cup of heavy cream. Beat the mixture on medium speed until it becomes light and fluffy, forming soft peaks. This fluffy texture is key to a delicious cheesecake layer, so take your time to ensure it’s well mixed.
Combining and Baking
Once your cake base and cheesecake filling are ready, it’s time to combine them. Carefully spread the cheesecake mixture evenly over the cooled red velvet cake in the springform pan. Use a spatula to smooth the top, ensuring an even layer. There’s no need to bake the cheesecake layer; instead, it will set perfectly in the refrigerator.
Before chilling, cover the springform pan with plastic wrap and place it in the refrigerator. Allow the cheesecake to chill for at least 4 hours, but for best results, let it set overnight. This chilling period enhances the flavors and provides the perfect texture.
Chilling the Dessert
The chilling process is vital for your Christmas Red Velvet Cheesecake, as it allows the cheesecake layer to firm up and meld together with the cake. Once the cheesecake has chilled, carefully remove it from the springform pan. You can use a hot knife to cut around the edges for easier removal.
For serving, slice the cheesecake into wedges and consider adding a dollop of whipped cream or a sprinkle of festive decorations like crushed candy canes or fresh berries for a beautiful presentation. Enjoy your delicious Christmas Red Velvet Cheesecake with family and friends!
Nutritional Information
When indulging in the festive delight of Christmas Red Velvet Cheesecake, it’s helpful to be aware of its nutritional profile. Below are the estimated nutritional values per serving (1 slice) based on standard ingredients used in the recipe:
- Calories: 450
- Fat: 25g
- Saturated Fat: 15g
- Trans Fat: 0g
- Cholesterol: 80mg
- Sodium: 300mg
- Carbohydrates: 50g
- Fiber: 2g
- Sugar: 30g
- Protein: 6g
These values are estimates and can vary based on ingredient brands and specific measurements used. Always consider portion sizes and enjoy this delightful dessert as part of a balanced holiday feast!
🍴 Top Kitchen Essentials You’ll Love




Tips for Success
Creating the perfect Christmas Red Velvet Cheesecake involves attention to detail and a few insider tips to elevate your baking game. Here are some pro tips to ensure your dessert turns out beautifully every time:
Ingredient Substitutions
- Buttermilk: If you don’t have buttermilk on hand, you can easily make a substitute by mixing 1 cup of milk with 1 tablespoon of vinegar or lemon juice. Let it sit for about 5 minutes before using.
- Vegetable Oil: You can substitute vegetable oil with melted coconut oil or unsweetened applesauce to reduce fat content.
- Gluten-Free Option: For a gluten-free version, use a 1:1 gluten-free baking flour blend in place of all-purpose flour.
Baking Techniques
- Room Temperature Ingredients: Make sure your eggs, buttermilk, and cream cheese are at room temperature before mixing. This helps with better emulsification and a smoother batter.
- Don’t Overmix: When combining your wet and dry ingredients, mix until just combined. Overmixing can lead to a denser cake.
- Testing for Doneness: Use a toothpick to check for doneness in the cake base. If it comes out with a few moist crumbs, it’s perfect. If it’s wet with batter, bake for a few more minutes.
Presentation Ideas
- Whipped Cream: Top your cheesecake with a generous dollop of freshly whipped cream for a classic look. You can also sprinkle cocoa powder or powdered sugar for an elegant touch.
- Festive Garnishes: Add festive garnishes such as crushed candy canes, pomegranate seeds, or fresh mint leaves to enhance visual appeal.
- Serving Temperature: Serve your cheesecake chilled but not too cold; letting it sit at room temperature for about 15 minutes before serving can enhance the flavors and creaminess.
By following these tips, you’ll be well on your way to creating a stunning and delicious Christmas Red Velvet Cheesecake that will wow your guests and become a holiday tradition in its own right!
Variations of Christmas Red Velvet Cheesecake
While the traditional Christmas Red Velvet Cheesecake is a delightful treat on its own, there are plenty of ways to add your personal touch or cater to different tastes. Here are some creative variations and adaptations you can try:
Flavor Variations or Recipe Twists
- Chocolate Chip Red Velvet Cheesecake: Fold in 1 cup of semi-sweet chocolate chips into the cheesecake layer for an added chocolatey richness.
- Spiced Red Velvet Cheesecake: Incorporate 1 teaspoon of cinnamon and 1/2 teaspoon of nutmeg into the cake batter for a warm, spiced flavor that complements the holiday season.
- Mint Chocolate Red Velvet Cheesecake: Add 1 teaspoon of peppermint extract to the cheesecake layer and garnish with crushed mint candies for a refreshing twist.
- Red Velvet Cheesecake Brownies: Combine the cheesecake layer with a brownie base instead of the red velvet cake. This adds a fudgy texture that chocolate lovers will adore.
Dietary-Friendly Adjustments
- Gluten-Free Option: Use a gluten-free all-purpose flour blend in place of regular flour to make a gluten-free version of the cheesecake.
- Vegan Red Velvet Cheesecake: Substitute the eggs with flax eggs (1 tablespoon of ground flaxseed mixed with 2.5 tablespoons of water per egg) and use a vegan cream cheese alternative along with coconut cream for the filling.
- Reduced Sugar Version: Swap granulated sugar with a sugar substitute like Stevia or erythritol to lower the sugar content without sacrificing sweetness.
- Dairy-Free Option: Use almond milk or coconut milk in place of buttermilk, and choose dairy-free cream cheese and whipped topping to make a dairy-free version.
With these variations, you can customize your Christmas Red Velvet Cheesecake to suit different dietary needs and flavor preferences, ensuring that everyone can enjoy this festive treat!
Storage & Reheating Instructions
Proper storage of your Christmas Red Velvet Cheesecake is essential to maintain its delicious flavor and creamy texture. Here’s how to store leftovers and reheat if necessary:
Best Storage Methods
To store your Christmas Red Velvet Cheesecake, follow these steps:
- Refrigerate: After the cheesecake has fully set, cover it tightly with plastic wrap or aluminum foil to prevent it from absorbing any odors from the refrigerator. It can be stored in the refrigerator for up to 5 days.
- Freeze: If you want to keep the cheesecake for a longer period, you can freeze it. Wrap the cheesecake tightly in plastic wrap, followed by a layer of aluminum foil to prevent freezer burn. It can be frozen for up to 2-3 months. For best results, slice the cheesecake before freezing so you can take out individual portions as needed.
Reheating or Defrosting Tips
If you’ve frozen your Christmas Red Velvet Cheesecake and need to defrost it, follow these tips:
- Defrosting: To defrost, transfer the cheesecake from the freezer to the refrigerator and let it thaw overnight. This slow defrosting method helps maintain the texture and flavor.
- Serving Temperature: For the best taste and texture, serve the cheesecake chilled but not too cold. Allow it to sit at room temperature for about 15-20 minutes before serving. This will enhance the creamy consistency of the cheesecake and make it easier to slice.
- Avoid Reheating: It is not recommended to reheat the cheesecake in the microwave or oven, as this can alter the texture and ruin the creamy filling. Enjoy it cold or at room temperature for the best experience.
By following these storage and reheating instructions, you can ensure that your Christmas Red Velvet Cheesecake remains delicious and fresh, ready to be enjoyed whenever you crave a festive treat!
Why You’ll Love This Recipe
The Christmas Red Velvet Cheesecake is not just a dessert; it’s a festive centerpiece that brings joy and delight to any gathering. Here are some reasons why you’ll love making and sharing this delicious treat:
- Stunning Appearance: The vibrant red color and creamy white cheesecake layer create an eye-catching dessert that is sure to impress your guests.
- Rich Flavor Combination: The luscious blend of rich red velvet cake and smooth cheesecake offers a luxurious taste experience that balances sweetness and creaminess perfectly.
- Easy to Prepare: With straightforward steps and simple ingredients, this recipe is accessible for bakers of all skill levels, making it a stress-free addition to your holiday baking.
- Versatile Dessert: This cheesecake can be adapted with various flavors and toppings, allowing you to customize it to suit different tastes and dietary preferences.
- Perfect for Celebrations: Whether it’s a Christmas party, family gathering, or festive dinner, this cheesecake is a delicious way to celebrate the season and create lasting memories.
FAQ Section
What If My Christmas Red Velvet Cheesecake Doesn’t Turn Out Right?
If your Christmas Red Velvet Cheesecake doesn’t turn out as expected, don’t worry! Common issues include a cracked top or a soggy texture. A cracked surface can occur if the cheesecake is baked at too high of a temperature or if it hasn’t been cooled slowly. To prevent cracks, bake your cheesecake in a water bath and avoid opening the oven door frequently. If the texture is off, it could be due to overmixing or underbaking. Always ensure that your ingredients are at room temperature and that you follow the baking time closely.
Can I Prepare This in Advance?
Absolutely! The Christmas Red Velvet Cheesecake can be prepared in advance, making it a perfect choice for holiday gatherings. You can bake the red velvet cake base a day or two ahead of time and store it in the refrigerator. The cheesecake layer can also be made a day ahead, allowing the flavors to meld beautifully. Just keep it covered in the fridge until you’re ready to serve. This dessert can be made up to 2-3 days in advance without losing its deliciousness!
What Ingredients Can I Swap?
There are several substitutions you can make when preparing your Christmas Red Velvet Cheesecake. For a dairy-free option, use almond milk or coconut milk instead of buttermilk and dairy-free cream cheese for the cheesecake layer. If you’re looking to reduce sugar, consider using a sugar substitute like stevia or erythritol. Additionally, if you have a gluten sensitivity, opt for a gluten-free flour blend instead of all-purpose flour. These swaps allow you to tailor the recipe to fit various dietary needs without compromising flavor!
Print
Christmas Red Velvet Cheesecake
- Total Time: 4 hours 30 minutes
- Yield: 12 servings 1x
- Diet: Vegetarian
Description
A festive dessert combining rich red velvet cake with creamy cheesecake.
Ingredients
- 2 cups all-purpose flour
- 1 ½ cups granulated sugar
- 1 teaspoon baking soda
- 1 teaspoon salt
- 1 cup vegetable oil
- 1 cup buttermilk
- 2 large eggs
- 2 tablespoons red food coloring
- 1 teaspoon vanilla extract
- 16 oz cream cheese, softened
- 1 cup powdered sugar
- 1 teaspoon vanilla extract
- 1 cup heavy cream
Instructions
- Preheat your oven to 350°F (175°C).
- In a bowl, mix flour, sugar, baking soda, and salt.
- In another bowl, combine oil, buttermilk, eggs, food coloring, and vanilla.
- Mix the wet and dry ingredients together.
- Pour the batter into a greased springform pan.
- Bake for 25-30 minutes or until a toothpick comes out clean.
- In a separate bowl, beat cream cheese and powdered sugar until smooth.
- Add vanilla and heavy cream, beat until fluffy.
- Once the cake cools, spread the cheesecake mixture on top.
- Chill in the refrigerator for at least 4 hours before serving.
🍴 Top Kitchen Essentials You’ll Love
Notes
- Use gel food coloring for better results.
- Let the cheesecake set overnight for best flavor.
- Top with whipped cream if desired.
- Prep Time: 30 minutes
- Cook Time: 30 minutes
- Category: Dessert
- Method: Baking
- Cuisine: American
Nutrition
- Serving Size: 1 slice
- Calories: 450
- Sugar: 30g
- Sodium: 300mg
- Fat: 25g
- Saturated Fat: 15g
- Unsaturated Fat: 5g
- Trans Fat: 0g
- Carbohydrates: 50g
- Fiber: 2g
- Protein: 6g
- Cholesterol: 80mg
Keywords: Christmas, Red Velvet, Cheesecake, Dessert