

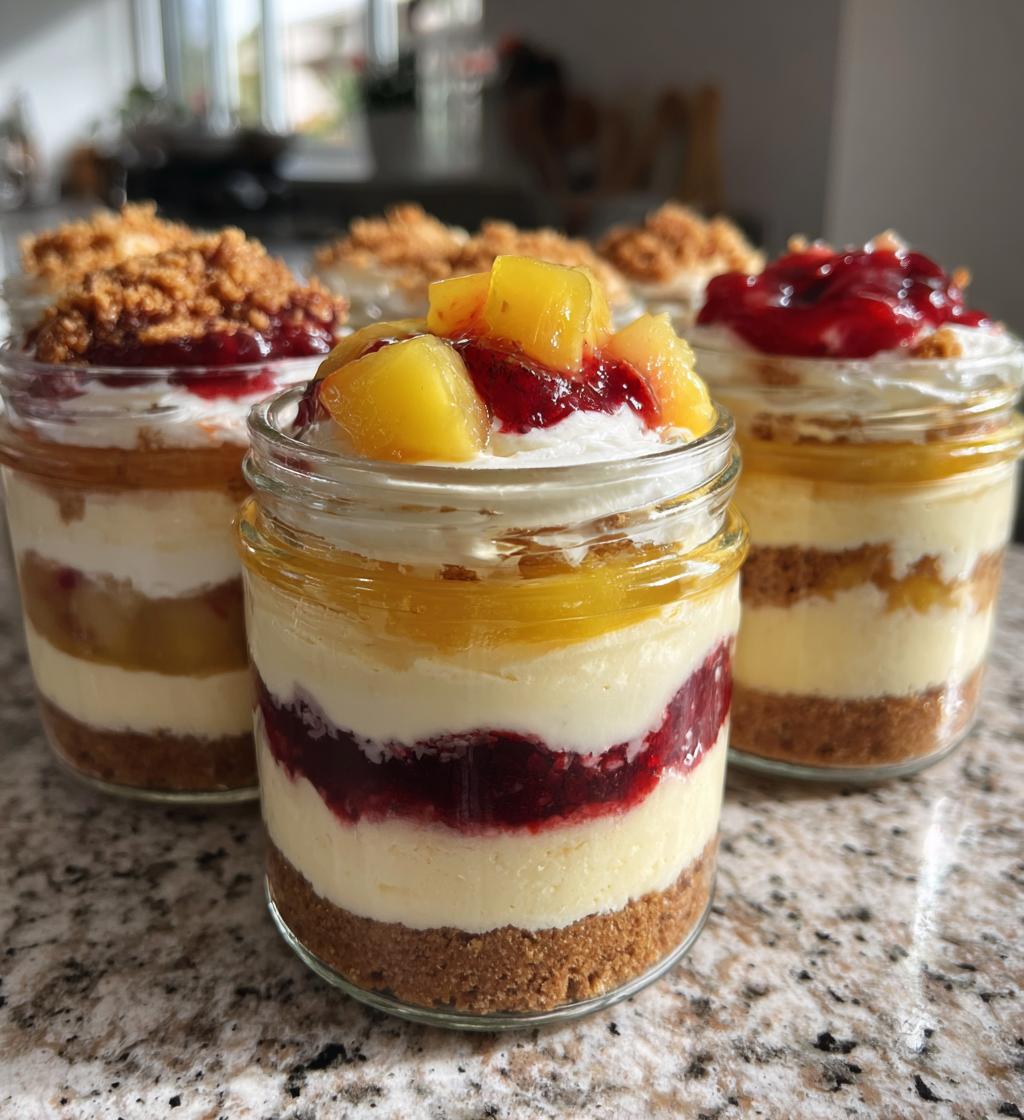
There’s something incredibly charming about individual desserts that makes them feel special and festive. Whether it’s a birthday celebration, a dinner party, or just a cozy night in, desserts served in their own little jars create an intimate and delightful experience. Among my favorites are *Cheesecake Jars*—a no-bake treat that marries creamy cheesecake with a crunchy graham cracker crust, all beautifully layered in a jar. I remember making these for my best friend’s surprise birthday party; the joy on her face when she saw her own personal dessert was priceless. Not only are they a hit at gatherings, but they also allow for endless customization. From fruity toppings to rich chocolate sauces, *Cheesecake Jars* can be tailored to suit any palate, making them the ultimate dessert choice for any occasion. Get ready to impress your guests (or yourself!) with this simple yet elegant treat!
Ingredients List
To create delicious *Cheesecake Jars*, you’ll need the following ingredients, each prepared in the specified state for the best results:
- 8 oz cream cheese, softened
- 1/2 cup granulated sugar
- 1 tsp vanilla extract
- 1 cup heavy whipping cream
- 1 cup graham cracker crumbs
- 1/4 cup butter, melted
- 1/2 cup fruit topping or chocolate sauce of your choice
Ensure that the cream cheese is fully softened to room temperature for easy mixing, and that the butter is melted before combining it with the graham cracker crumbs. These details will help achieve a smooth and well-layered cheesecake jar.
How to Prepare Cheesecake Jars
Making *Cheesecake Jars* is a straightforward process that yields delicious results. Follow these step-by-step instructions to create your own delightful jars of cheesecake.
Step-by-Step Instructions
- Prepare the Cheesecake Mixture: In a mixing bowl, beat together the softened cream cheese, granulated sugar, and vanilla extract using an electric mixer. Mix until the mixture is smooth and creamy, ensuring no lumps remain. This should take about 2-3 minutes.
- Whip the Cream: In a separate bowl, pour in the heavy whipping cream. Using a hand mixer or stand mixer, whip the cream until stiff peaks form. Be careful not to over-whip, as this can cause the cream to become grainy.
- Combine Mixtures: Gently fold the whipped cream into the cream cheese mixture. Use a spatula and combine in a circular motion, taking care not to deflate the whipped cream. This should create a light and airy cheesecake filling.
- Prepare the Crust: In another bowl, mix the graham cracker crumbs with the melted butter until the crumbs are evenly coated. This mixture will form the base layer of your cheesecake jars.
- Layer the Ingredients: Start layering your jars. First, spoon a layer of the graham cracker mixture into the bottom of each jar, pressing it down gently. Next, add a layer of the cheesecake mixture on top of the crumbs, smoothing it out with a spatula. Then, add your choice of fruit topping or chocolate sauce.
- Repeat the Layers: Continue layering the graham cracker crumbs, cheesecake mixture, and toppings until the jars are filled, leaving a little space at the top for presentation.
- Chill: Once all the jars are assembled, cover them with lids or plastic wrap. Place the jars in the refrigerator to chill for at least 2 hours. This allows the flavors to meld and the cheesecake to set properly.
- Serve: After chilling, your *Cheesecake Jars* are ready to serve! Enjoy them cold, straight from the fridge, and get ready for compliments from your guests.
Why You’ll Love This Recipe
These *Cheesecake Jars* are not just delightful to eat, but they also come with a variety of benefits that make them a must-try dessert:
- Easy Preparation: With no baking required, you can whip these up in just a matter of minutes.
- Customizable Flavors: Choose your favorite toppings, from fresh fruits to rich chocolate sauces, to personalize each jar.
- No-Bake Convenience: Perfect for warm days or when you want a dessert without the oven heat.
- Individual Servings: Each jar is a perfect portion, making them ideal for parties or gatherings.
- Make Ahead: Prepare them in advance and chill, allowing for stress-free entertaining.
🍴 Top Kitchen Essentials You’ll Love




Tips for Success
To ensure your *Cheesecake Jars* turn out perfectly every time, consider these helpful tips:
- Use Room Temperature Ingredients: Make sure your cream cheese is at room temperature before mixing. This helps achieve a smooth and creamy texture without lumps.
- Folding Technique: When incorporating the whipped cream into the cream cheese mixture, fold gently using a spatula. Start from the bottom and lift the mixture over the top. This technique helps retain the airiness of the whipped cream, resulting in a light cheesecake filling.
- Chill Time: Don’t rush the chilling process. Allow the jars to chill in the refrigerator for at least 2 hours to set properly. For the best flavor, consider chilling them overnight.
- Layering Precision: When layering, press the graham cracker crust down gently but firmly to create a stable base. This prevents the layers from mixing together when you dig in.
- Check for Sweetness: Taste the cheesecake mixture before layering. Depending on your topping choice, you may want to adjust the sugar for your preference.
Variations
Get creative with your *Cheesecake Jars* by trying out different toppings and flavor combinations! Here are some fun variations to consider:
- Fruit Medley: Top your jars with fresh berries like strawberries, blueberries, or raspberries for a refreshing twist.
- Chocolate Delight: Drizzle melted chocolate or Nutella over the cheesecake layer for a rich, indulgent flavor.
- Caramel Swirl: Add a layer of caramel sauce between the cheesecake and crust for a sweet surprise.
- Nutty Crunch: Sprinkle crushed nuts like pecans or walnuts on top for added texture and flavor.
- Spiced Pumpkin: Incorporate pumpkin puree and pumpkin spice into the cheesecake mixture for a seasonal treat.
Feel free to mix and match these ideas to create a unique dessert that suits your taste!
Nutritional Information Section
When enjoying your delicious *Cheesecake Jars*, it’s helpful to know the estimated nutritional information. Please note that these values can vary based on the specific ingredients and brands used, so they are not provided precisely. Here are the typical nutritional values per serving (1 jar):
- Calories: 320
- Fat: 24g
- Protein: 4g
- Carbohydrates: 28g
- Sugar: 18g
- Sodium: 200mg
- Cholesterol: 80mg
Keep in mind that if you make substitutions or add different toppings, these values may change. Always check packaging for the most accurate nutritional information!
Storage & Reheating Instructions
To keep your delicious *Cheesecake Jars* fresh, store any leftovers in the refrigerator for up to 3 days. Make sure to cover the jars tightly with lids or plastic wrap to prevent them from absorbing any odors from the fridge. When you’re ready to enjoy them again, simply take them out and serve cold. There’s no need to reheat these delightful treats, as they are best enjoyed chilled. If you find that the layers have settled slightly, give the jars a gentle shake or stir before serving to restore their beautiful presentation.
FAQ Section
What If My Cheesecake Jars Don’t Turn Out Right?
If your *Cheesecake Jars* don’t turn out as expected, don’t worry! Common issues might include a runny filling or layers that don’t hold. Ensure that your cream cheese is softened and well-blended before folding in the whipped cream, as lumps can lead to a less stable cheesecake. If the mixture is too runny, it may not have chilled long enough; give it more time in the refrigerator to set properly.
Can I Prepare This in Advance?
Yes, you can prepare *Cheesecake Jars* in advance! They are perfect for make-ahead desserts. Assemble the jars, seal them, and store them in the refrigerator for up to 3 days before serving. Just be sure to add any fresh fruit toppings right before serving to prevent them from becoming soggy.
What Ingredients Can I Swap?
You can easily customize your *Cheesecake Jars* by swapping ingredients to suit your dietary needs. For a gluten-free option, use gluten-free graham crackers or crushed nuts for the crust. If you’re looking for a dairy-free version, consider using vegan cream cheese and coconut whipped cream. Additionally, you can use flavored extracts like almond or lemon for a twist on traditional vanilla.
How Do I Make the Layers Even?
To achieve perfectly even layers in your *Cheesecake Jars*, use a small spoon or spatula to press down the graham cracker crust layer firmly before adding the cheesecake mixture. When adding the cheesecake filling, smooth it out gently with a spatula to create an even surface. If needed, you can also use a piping bag to neatly layer the cheesecake filling.
Can I Freeze Cheesecake Jars?
While it’s not recommended to freeze *Cheesecake Jars* due to the texture changes that can occur, you can freeze the cheesecake mixture separately. Just be sure to thaw it in the refrigerator before layering it into the jars. For best results, enjoy your jars fresh from the fridge rather than frozen.
Print
Cheesecake Jars
- Total Time: 2 hours 20 minutes
- Yield: 4 servings 1x
- Diet: Vegetarian
Description
Delicious individual cheesecake jars layered with creamy cheesecake and your choice of toppings.
Ingredients
- 8 oz cream cheese, softened
- 1/2 cup granulated sugar
- 1 tsp vanilla extract
- 1 cup heavy whipping cream
- 1 cup graham cracker crumbs
- 1/4 cup butter, melted
- 1/2 cup fruit topping or chocolate sauce
Instructions
- In a mixing bowl, beat the cream cheese, sugar, and vanilla until smooth.
- In another bowl, whip the heavy cream until stiff peaks form.
- Gently fold the whipped cream into the cream cheese mixture.
- In a separate bowl, combine the graham cracker crumbs and melted butter.
- Layer the graham cracker mixture at the bottom of your jars.
- Add a layer of the cheesecake mixture on top of the crumbs.
- Add your choice of fruit topping or chocolate sauce.
- Repeat the layers until the jars are full.
- Chill in the refrigerator for at least 2 hours before serving.
Notes
- You can use any fruit topping you like.
- Store leftovers in the refrigerator for up to 3 days.
- Prep Time: 20 minutes
- Cook Time: 0 minutes
- Category: Dessert
- Method: No-bake
- Cuisine: American
Nutrition
- Serving Size: 1 jar
- Calories: 320
- Sugar: 18g
- Sodium: 200mg
- Fat: 24g
- Saturated Fat: 14g
- Unsaturated Fat: 8g
- Trans Fat: 0g
- Carbohydrates: 28g
- Fiber: 1g
- Protein: 4g
- Cholesterol: 80mg
Keywords: Cheesecake Jars, Dessert, No-bake Cheesecake