

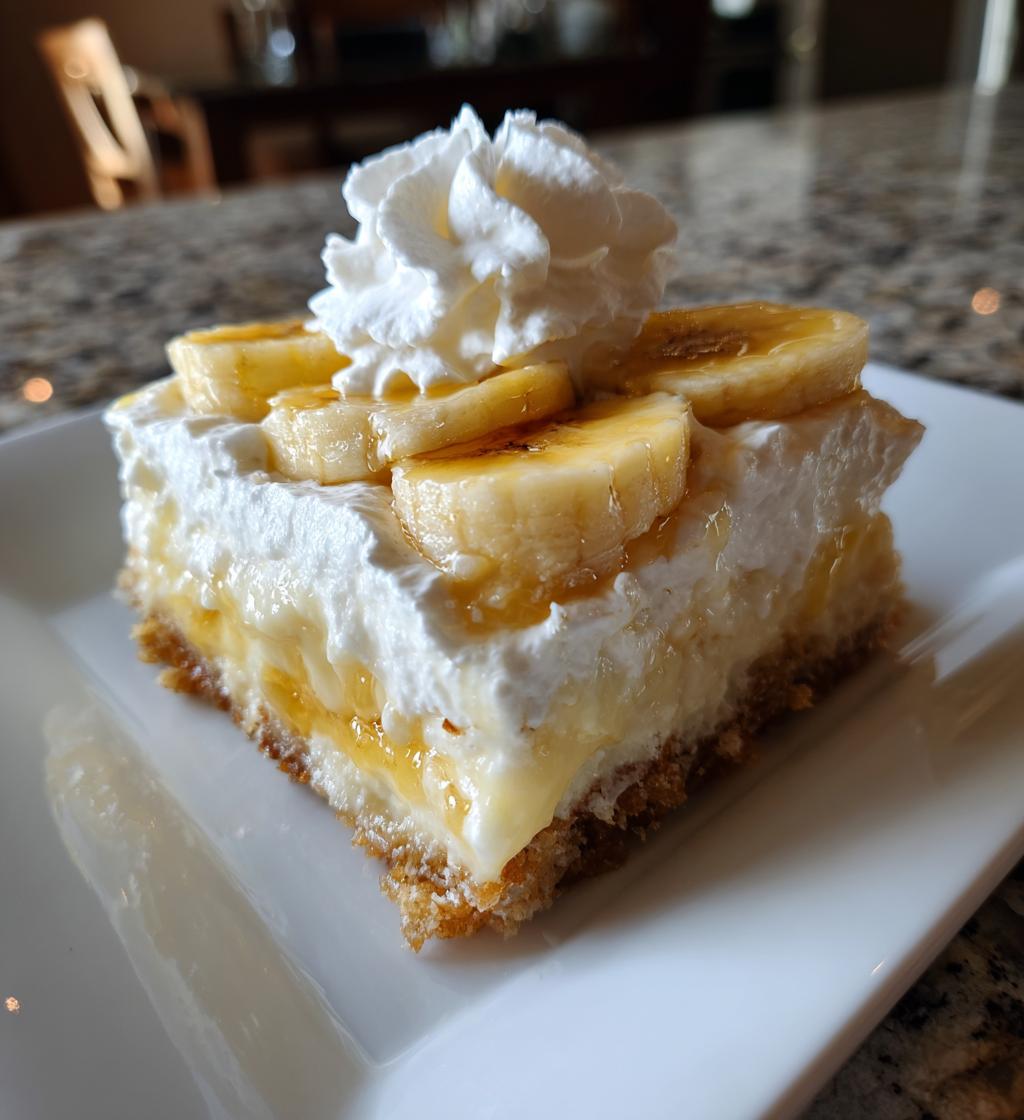
Banana Pudding Bars are the perfect dessert for anyone who loves the classic flavors of banana pudding but craves a portable, easy-to-serve treat. These delightful bars feature layers of creamy vanilla pudding, sweet banana slices, and crunchy vanilla wafers, all topped with a luscious layer of whipped cream. The combination of textures—smooth, creamy, and crunchy—creates a deliciously satisfying bite that will have everyone reaching for seconds. Whether you’re hosting a summer barbecue, a birthday party, or simply treating yourself, Banana Pudding Bars are sure to be a hit. With their no-bake method, they’re quick to prepare and require minimal effort, making them an ideal choice for any occasion.
Ingredients for Banana Pudding Bars
- 2 ripe bananas, sliced
- 1 package (3.4 oz) vanilla pudding mix
- 2 cups cold milk
- 1 package (11 oz) vanilla wafers
- 1 cup whipped cream, plus extra for topping
- 1 teaspoon vanilla extract
How to Prepare Banana Pudding Bars
Preparing Banana Pudding Bars is a simple process that allows you to enjoy a delicious dessert with minimal effort. Follow these step-by-step instructions to create the perfect bars that everyone will love.
Step-by-Step Instructions
- Prepare the Vanilla Pudding: In a mixing bowl, combine the package of vanilla pudding mix with 2 cups of cold milk. Whisk the mixture vigorously for about 2 minutes, or until it thickens and becomes smooth. This will be the creamy base of your Banana Pudding Bars.
- Layer the Vanilla Wafers: Take a baking dish (approximately 9×9 inches) and start layering the vanilla wafers at the bottom. Arrange them in a single layer, covering the entire base of the dish. This will provide a crunchy foundation for your bars.
- Add the Sliced Bananas: Once the wafers are in place, evenly distribute the sliced bananas over the wafers. Make sure to cover as much of the surface as possible, allowing the banana flavor to infuse throughout the dessert.
- Pour the First Layer of Pudding: Carefully pour half of the prepared vanilla pudding over the banana layer. Use a spatula to gently spread it out, ensuring the bananas are covered well for better flavor integration.
- Repeat the Layers: Next, add another layer of vanilla wafers on top of the pudding, followed by another layer of sliced bananas. Finally, pour the remaining pudding mixture over the top, covering everything completely.
- Add Whipped Cream: Spread the cup of whipped cream evenly over the top layer of pudding. This will add a delightful creaminess and is essential for the final presentation. For an extra touch, consider adding a few banana slices on top of the whipped cream.
- Refrigerate: Cover the baking dish with plastic wrap or a lid and refrigerate the Banana Pudding Bars for at least 2 hours. This chilling time is crucial as it allows the layers to set and meld together, enhancing the flavors and making them easier to cut into bars.
Once chilled, your Banana Pudding Bars are ready to be sliced and served. Enjoy this creamy, dreamy dessert with family and friends!
Why You’ll Love This Recipe
- Quick Preparation: With just a few simple steps, you can whip up these Banana Pudding Bars in no time, making them perfect for last-minute gatherings.
- No-Bake Convenience: There’s no need to turn on the oven! These bars are completely no-bake, which means less heat in the kitchen and easy cleanup.
- Delightful Flavor: The combination of ripe bananas, creamy pudding, and crunchy vanilla wafers creates a deliciously satisfying flavor profile that appeals to everyone.
- Perfect for Any Occasion: Whether it’s a summer barbecue, a birthday party, or a casual family dinner, these Banana Pudding Bars are a crowd-pleaser.
- Customizable: You can easily tailor the recipe by adding your favorite toppings or variations, making it a versatile dessert option.
- Kid-Friendly: Kids love these bars! They are not only fun to eat but also a great way to introduce them to the joy of cooking.
🍴 Top Kitchen Essentials You’ll Love




Tips for Success with Banana Pudding Bars
To ensure your Banana Pudding Bars turn out perfectly every time, consider these practical tips:
Choose Ripe Bananas
Using ripe bananas not only enhances the flavor but also adds a natural sweetness that complements the pudding and wafers. Look for bananas that have a few brown spots for optimal taste.
Use Cold Milk for Pudding
For the best texture, make sure to use cold milk when preparing the vanilla pudding. This helps the pudding set properly and achieve the creamy consistency you desire.
Layering Technique
When layering the ingredients, make sure to cover each layer completely. This ensures every bite has a balanced flavor of bananas, pudding, and wafers. Avoid leaving gaps between layers for a more cohesive dessert.
Chill Time is Essential
Allowing the Banana Pudding Bars to chill for at least 2 hours is crucial. This resting period enables the layers to firm up, making it easier to cut into neat bars. If possible, chill them overnight for even better results.
Presentation Matters
For a beautiful presentation, consider adding extra whipped cream and banana slices on top just before serving. This not only enhances the visual appeal but also adds freshness to each bar.
Use a Sharp Knife
When ready to serve, use a sharp knife to cut the bars. This will help you achieve clean edges, making for an attractive presentation. It’s best to dip the knife in warm water and wipe it dry between cuts for even smoother slicing.
Experiment with Flavors
Don’t hesitate to experiment with different flavors. You can try adding chocolate pudding, a sprinkle of cinnamon, or even some crushed nuts for texture. This flexibility allows you to customize your Banana Pudding Bars to suit your taste preferences.
Variations on Banana Pudding Bars
Banana Pudding Bars are a deliciously versatile dessert that can be customized in various ways to suit your taste. Here are some fun and creative variations to consider:
Flavor Twists
- Chocolate Banana Pudding Bars: Swap out the vanilla pudding mix for chocolate pudding for a rich and indulgent twist. Layer with chocolate wafer cookies for a delightful chocolate-banana combination.
- Peanut Butter Banana Pudding Bars: Add a layer of peanut butter between the banana and pudding layers for a nutty flavor that pairs beautifully with bananas. You can also mix peanut butter into the whipped cream for an extra creamy topping.
- Coconut Banana Pudding Bars: Incorporate shredded coconut into the pudding mixture or sprinkle it on top of the whipped cream for a tropical flair. Use coconut-flavored whipped cream for additional coconut goodness.
- Berry Banana Pudding Bars: Layer in fresh berries such as strawberries or blueberries along with the bananas for a burst of color and flavor. The tartness of the berries complements the sweetness of the bananas perfectly.
Dietary-Friendly Adjustments
- Vegan Banana Pudding Bars: Substitute the vanilla pudding mix with a vegan-friendly version, use almond or coconut milk instead of regular milk, and opt for dairy-free whipped cream. This way, you can enjoy a delicious dessert that’s suitable for a plant-based diet.
- Gluten-Free Banana Pudding Bars: Use gluten-free vanilla wafers to make this dessert accessible for those with gluten sensitivities. Ensure that other ingredients, like the pudding mix, are labeled gluten-free as well.
- Low Sugar Banana Pudding Bars: For a healthier option, use sugar-free pudding mix and consider using a sugar substitute in the whipped cream. This variation allows you to enjoy the flavors without the added sugar.
Feel free to mix and match these variations to create your own unique version of Banana Pudding Bars that your family and friends will love!
Nutritional Information for Banana Pudding Bars
The following nutritional information is an estimate based on the ingredients used in the Banana Pudding Bars recipe. Keep in mind that actual values may vary depending on the specific brands and quantities of ingredients you choose. Here’s a breakdown of the estimated nutrition per serving (1 bar):
- Calories: 180
- Fat: 5g
- Saturated Fat: 2g
- Unsaturated Fat: 3g
- Trans Fat: 0g
- Cholesterol: 10mg
- Sodium: 100mg
- Carbohydrates: 30g
- Fiber: 1g
- Sugar: 15g
- Protein: 3g
These banana pudding bars are a delicious treat that provides a balance of sweetness and creaminess, making them a delightful dessert option. Enjoy them in moderation as part of a balanced diet!
FAQ About Banana Pudding Bars
What If My Banana Pudding Bars Doesn’t Turn Out Right?
If your Banana Pudding Bars don’t set properly or seem too runny, it may be due to insufficient chilling time or not mixing the pudding correctly. Ensure you allow at least 2 hours in the refrigerator for the bars to firm up. If the pudding is too thin, it might not have been whisked long enough with the milk. Always follow the package instructions for the pudding mix to achieve the right consistency.
Can I Prepare This in Advance?
Yes, Banana Pudding Bars are perfect for making ahead of time! You can prepare them a day in advance and store them in the refrigerator. This not only allows the flavors to meld but also makes it convenient for gatherings. Just be sure to cover the dish tightly with plastic wrap to prevent any odors from the fridge affecting your dessert.
What Ingredients Can I Swap?
There are several ingredients you can swap in the Banana Pudding Bars recipe. For example, you can use almond milk or coconut milk instead of regular milk for a dairy-free option. If you prefer a gluten-free version, simply replace the vanilla wafers with gluten-free cookies. For a lower sugar option, use sugar-free pudding mix and sweeten the whipped cream with a sugar substitute.
Can I Freeze Banana Pudding Bars?
While it’s possible to freeze Banana Pudding Bars, the texture may change once thawed. If you choose to freeze them, cut the bars into individual servings and wrap them tightly in plastic wrap before placing them in an airtight container. When ready to enjoy, let them thaw in the refrigerator overnight for the best results.
How Do I Make Banana Pudding Bars Vegan?
To make Banana Pudding Bars vegan, substitute the vanilla pudding mix with a plant-based alternative, use non-dairy milk, and opt for vegan whipped cream. This way, you can still enjoy the creamy, delicious flavor of banana pudding bars without any animal products!
Storage & Reheating Instructions
To keep your Banana Pudding Bars fresh and delicious, proper storage is essential. Here are some guidelines on how to store leftovers and any reheating tips, if applicable:
Best Storage Methods
After preparing your Banana Pudding Bars, you can store them in the refrigerator. Here’s how:
- Cover Tightly: Use plastic wrap or aluminum foil to cover the baking dish tightly. This prevents the bars from absorbing any odors from the refrigerator and keeps them fresh.
- Use an Airtight Container: If you prefer, you can transfer the bars to an airtight container for better protection. Make sure the container is large enough to accommodate the bars without squishing them.
- Refrigerate: Store the Banana Pudding Bars in the refrigerator for up to 4-5 days. The longer they sit, the more the flavors will meld, but it’s best to consume them within this timeframe for optimum freshness.
Reheating Tips
Banana Pudding Bars are typically served chilled and do not require reheating. However, if you prefer to enjoy them slightly warmed, here are some tips:
- Gentle Warming: If you want to warm up a serving, place it on a microwave-safe plate and heat it in the microwave for about 10-15 seconds. Make sure to check frequently to avoid overheating, as the pudding can become too soft.
- Enjoy Cold: Most people find that Banana Pudding Bars are best enjoyed cold straight from the refrigerator, as this enhances the creamy texture and refreshing flavor.
By following these storage and reheating instructions, you can ensure your Banana Pudding Bars remain delicious and satisfying for days to come!
Print
Banana Pudding Bars
- Total Time: 2 hours 20 minutes
- Yield: 12 servings 1x
- Diet: Vegetarian
Description
Delicious and creamy banana pudding bars layered with cookies and topped with whipped cream.
Ingredients
- 2 ripe bananas, sliced
- 1 package vanilla pudding mix
- 2 cups milk
- 1 package vanilla wafers
- 1 cup whipped cream
- 1 teaspoon vanilla extract
Instructions
- Prepare the vanilla pudding according to package instructions.
- Layer vanilla wafers in the bottom of a baking dish.
- Add a layer of sliced bananas over the wafers.
- Pour half of the prepared pudding over the bananas.
- Add another layer of vanilla wafers and bananas.
- Pour the remaining pudding over the top.
- Spread whipped cream on top and refrigerate for at least 2 hours before serving.
🍴 Top Kitchen Essentials You’ll Love
Notes
- For extra flavor, use ripe bananas.
- Chill the bars for better texture.
- Top with additional banana slices before serving.
- Prep Time: 20 minutes
- Cook Time: 0 minutes
- Category: Dessert
- Method: No-Bake
- Cuisine: American
Nutrition
- Serving Size: 1 bar
- Calories: 180
- Sugar: 15g
- Sodium: 100mg
- Fat: 5g
- Saturated Fat: 2g
- Unsaturated Fat: 3g
- Trans Fat: 0g
- Carbohydrates: 30g
- Fiber: 1g
- Protein: 3g
- Cholesterol: 10mg
Keywords: Banana Pudding Bars, Banana Dessert, No-Bake Dessert