

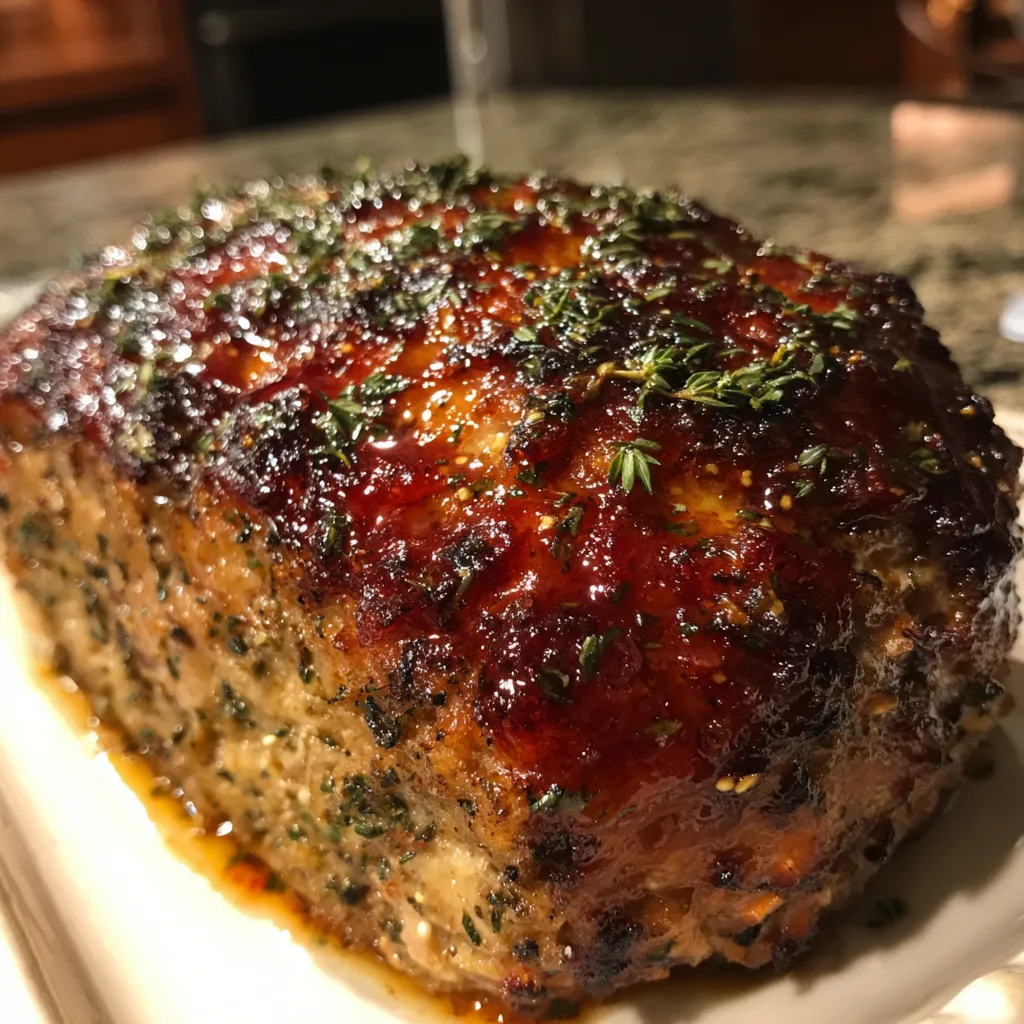
Why You’ll Love This Roasted Garlic Herb Meatloaf
This Roasted Garlic Herb Meatloaf is a delightful dish that combines rich flavors and a comforting texture. The roasted garlic adds a sweet, nutty taste, while the herbs bring freshness to every bite. Perfect for family dinners or holiday gatherings, this meatloaf is sure to impress your guests. Serve it with mashed potatoes or a side salad for a complete meal that everyone will love!
What You’ll Need for Roasted Garlic Herb Meatloaf
Gathering the right ingredients is key to making a delicious Roasted Garlic Herb Meatloaf. Here’s what you’ll need:
Complete Ingredients List
- 1 pound ground beef
- 1 head of roasted garlic (approximately 10-12 cloves)
- 2 tablespoons fresh thyme, chopped
- 2 tablespoons fresh rosemary, chopped
- 1 cup breadcrumbs
- 2 large eggs
- 1 medium onion, finely chopped
- 2 tablespoons Worcestershire sauce
- 1 teaspoon salt
- 1/2 teaspoon black pepper
- 1/4 cup ketchup (for glaze)
Ingredient Substitutions & Alternatives
If you have dietary restrictions, don’t worry! You can easily swap ingredients. For a gluten-free option, use gluten-free breadcrumbs. If you prefer a vegetarian version, try using lentils or a meat substitute. You can also experiment with different herbs like thyme or oregano for a unique flavor twist.
How to Make Roasted Garlic Herb Meatloaf

Making Roasted Garlic Herb Meatloaf is simple and rewarding. Follow these steps for a perfect loaf:
Step 1: Prepare the Roasted Garlic
Preheat your oven to 400°F (200°C). Cut the top off the head of garlic to expose the cloves, drizzle with olive oil, wrap in foil, and roast for about 30-35 minutes until soft and caramelized. Allow to cool, then squeeze the roasted garlic cloves out of their skins into a bowl and mash them with a fork.
Step 2: Preheat the Oven for Meatloaf
While the garlic is roasting, preheat your oven to 350°F (175°C) for the meatloaf.
Step 3: Mix the Meatloaf Ingredients
In a large mixing bowl, combine the ground beef, mashed roasted garlic, chopped thyme, chopped rosemary, breadcrumbs, eggs, chopped onion, Worcestershire sauce, salt, and black pepper. Use your hands or a spoon to mix until just combined; avoid overmixing to keep the meatloaf tender.
Step 4: Shape the Meatloaf
Transfer the mixture to a loaf pan or shape it into a loaf on a lined baking sheet. Smooth the top and sides for an even shape.
Step 5: Prepare the Glaze
In a small bowl, mix the ketchup with a tablespoon of Worcestershire sauce (optional) for added flavor. Spread the glaze evenly over the top of the meatloaf.
Step 6: Bake the Meatloaf
Place the meatloaf in the preheated oven and bake for about 1 hour, or until the internal temperature reaches 160°F (70°C) and the top is nicely browned.
Step 7: Rest and Serve
Once done, remove the meatloaf from the oven and let it rest for about 10 minutes before slicing. This helps retain the juices. Serve warm, garnished with additional fresh herbs if desired.
🍴 Top Kitchen Essentials You’ll Love




Serving Suggestions for Roasted Garlic Herb Meatloaf
When it comes to serving your Roasted Garlic Herb Meatloaf, presentation matters. Here are some tips:
How to Serve Roasted Garlic Herb Meatloaf
Let the meatloaf rest for about 10 minutes before slicing. This helps keep it juicy. Serve it warm on a platter, garnished with fresh herbs for a pop of color.
Perfect Pairings & Toppings
This meatloaf pairs wonderfully with creamy mashed potatoes or a fresh garden salad. You can also add a side of steamed vegetables for a balanced meal. Consider topping it with additional roasted garlic or a sprinkle of fresh herbs for extra flavor.
Storing & Preserving Roasted Garlic Herb Meatloaf
To keep your Roasted Garlic Herb Meatloaf fresh, follow these storage tips:
Best Storage Methods
Store any leftovers in an airtight container in the refrigerator. It will stay fresh for up to 3 days. Make sure it’s completely cooled before sealing.
Reheating or Freezing Tips
To reheat, simply place slices in the microwave for a quick meal. If you want to freeze it, wrap the meatloaf tightly in plastic wrap and then in aluminum foil. It can be frozen for up to 3 months. Thaw in the refrigerator before reheating.
Tips for Perfect Roasted Garlic Herb Meatloaf Every Time
Here are some helpful tips to ensure your meatloaf turns out perfectly:
Avoid These Common Mistakes
- Don’t overmix the meat mixture, as it can make the meatloaf tough.
- Make sure to measure your ingredients accurately for the best results.
Helpful Tricks for Success
For added moisture, consider adding a splash of milk or broth to the mixture. Also, using a meat thermometer can help you achieve the perfect doneness without guesswork.
Fun Variations of Roasted Garlic Herb Meatloaf
Get creative with your Roasted Garlic Herb Meatloaf by trying these variations:
Flavor Variations or Recipe Twists
Mix in some chopped bell peppers or mushrooms for added texture. You can also incorporate different cheeses like cheddar for a cheesy twist.
Dietary-Friendly Adjustments
To make it vegan, substitute the ground beef with a plant-based alternative and use flaxseed meal instead of an egg. For a low-carb option, consider using cauliflower rice instead of breadcrumbs.
FAQs
What If My Roasted Garlic Herb Meatloaf Doesn’t Turn Out Right?
If your meatloaf is too dry, it may have overcooked. Always check the internal temperature. If it’s too moist, try adding more breadcrumbs next time.
Can I Prepare This in Advance?
Absolutely! You can prepare the meat mixture a day ahead and store it in the fridge. Just shape and bake it when you’re ready to serve.
What Ingredients Can I Swap?
You can swap ground beef for turkey or chicken. For a gluten-free option, use gluten-free breadcrumbs or oats. Feel free to experiment with herbs and spices to suit your taste!
Print
Roasted Garlic Herb Meatloaf
- Total Time: 55 minutes
- Yield: 4 servings 1x
- Diet: Vegetarian
Description
A delightful dish that combines sweet and savory flavors, perfect for fall gatherings and packed with nutrients.
Ingredients
- 2 medium acorn squashes
- 1 cup quinoa
- 2 cups vegetable broth
- 1/2 cup dried cranberries
- 1/2 cup walnuts, chopped
- 1 small onion, diced
- 2 cloves garlic, minced
- 2 tablespoons olive oil
- 1 teaspoon ground cinnamon
- Salt and pepper to taste
- Fresh parsley for garnish
Instructions
- Preheat your oven to 400°F (200°C). Cut the acorn squashes in half and scoop out the seeds. Drizzle olive oil on the cut sides and sprinkle with salt and pepper. Place them cut-side down on a baking sheet and roast for about 25-30 minutes until tender.
- While the squash is roasting, rinse the quinoa under cold water. In a medium saucepan, combine the quinoa and vegetable broth. Bring it to a boil, then reduce the heat to low, cover, and simmer for about 15 minutes or until the quinoa is fluffy and the liquid is absorbed.
- In a skillet, heat olive oil over medium heat. Add the diced onion and cook until translucent, about 5 minutes. Then, add the minced garlic and cook for another minute. Stir in the cooked quinoa, dried cranberries, and cinnamon. Mix well and season with salt and pepper.
- Once the acorn squash is done roasting, carefully flip them cut-side up. Spoon the quinoa mixture into each half, packing it in gently. Return the stuffed squash to the oven and bake for an additional 10 minutes.
🍴 Top Kitchen Essentials You’ll Love
Notes
- Store leftovers in an airtight container in the refrigerator for up to 3 days.
- For freezing, wrap each half tightly in plastic wrap and place in a freezer-safe bag for up to 3 months.
- Reheat in the oven at 350°F (175°C) for about 15-20 minutes.
- Prep Time: 15 minutes
- Cook Time: 40 minutes
- Category: Main Course
- Method: Baking
- Cuisine: American
Nutrition
- Serving Size: 1 stuffed half
- Calories: 300
- Sugar: 8g
- Sodium: 200mg
- Fat: 12g
- Saturated Fat: 1g
- Unsaturated Fat: 10g
- Trans Fat: 0g
- Carbohydrates: 45g
- Fiber: 6g
- Protein: 8g
- Cholesterol: 0mg
Keywords: Stuffed Acorn Squash, Quinoa, Cranberries, Fall Recipe, Healthy Dish