

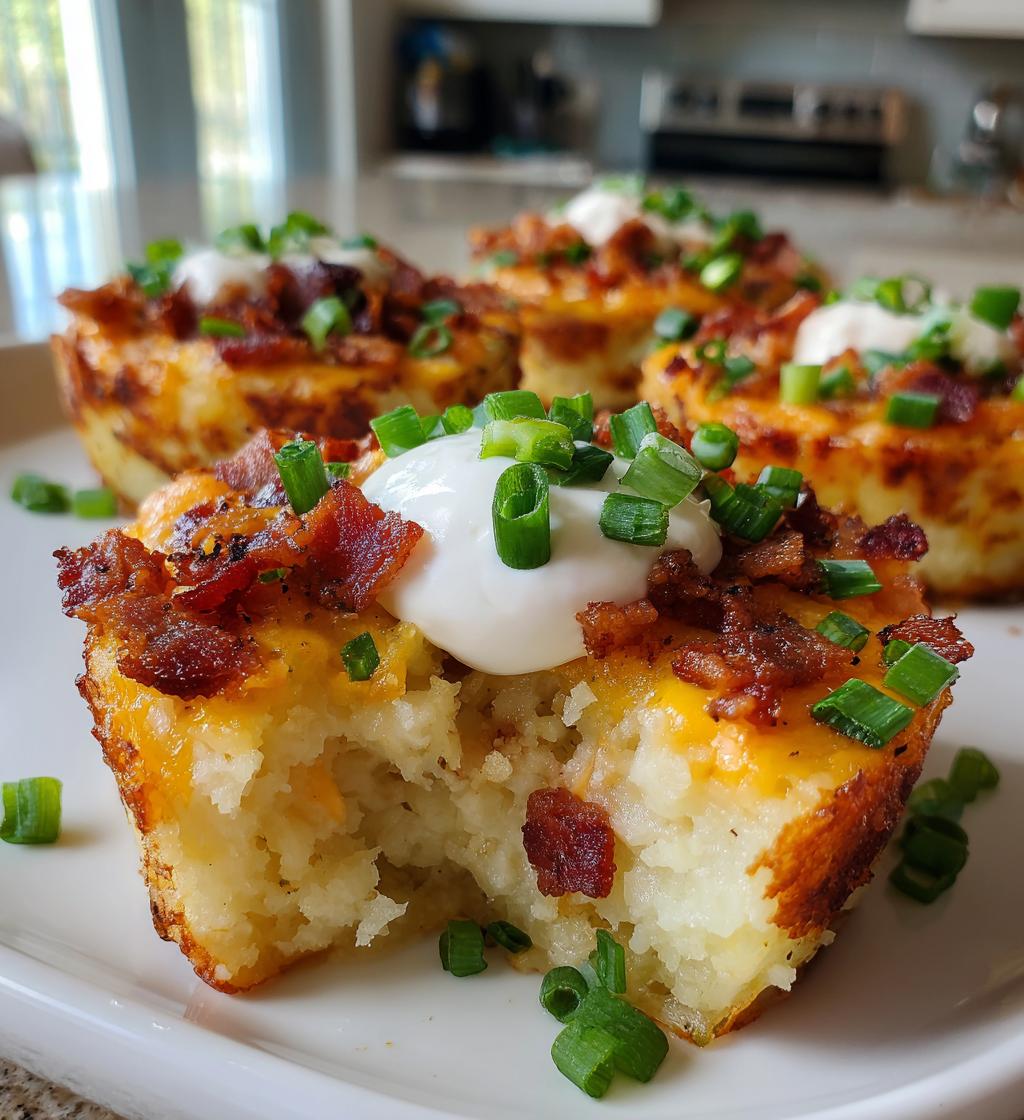
Welcome to the delightful world of Mashed Potato Nests! These little culinary creations are not only visually appealing but also incredibly versatile, making them a perfect addition to any meal. Imagine crispy, golden-brown potato nests that cradle your favorite toppings—it’s comfort food at its finest! I remember the first time I made these, watching as my friends and family dove into them with delight, each one customizing their nest with a variety of toppings. From savory bacon and cheese to fresh herbs and creamy sauces, the possibilities are endless. Whether you’re serving them as a side dish for a family dinner or as a fun appetizer for a gathering, Mashed Potato Nests are sure to impress and satisfy. Let’s explore how to create these delicious bites that are sure to become a staple in your kitchen.
Ingredients List
To create delicious Mashed Potato Nests, you will need the following ingredients:
- 2 cups of mashed potatoes
- 1 cup of shredded cheese (cheddar or your choice)
- 1/2 cup of cooked bacon, crumbled
- 1/4 cup of green onions, chopped
- 1/2 cup of sour cream
- Salt and pepper to taste
Make sure to use freshly made mashed potatoes for the best texture and flavor in your nests!
How to Prepare Mashed Potato Nests
Creating Mashed Potato Nests is a straightforward process that brings together simple ingredients for a delightful dish. Follow these step-by-step instructions to ensure your nests turn out perfectly every time.
Step-by-Step Instructions
- Preheat the Oven: Start by preheating your oven to 375°F (190°C). This step is crucial as it ensures that your nests cook evenly and become golden brown.
- Prepare the Mashed Potatoes: In a mixing bowl, combine the freshly made mashed potatoes with salt and pepper to taste. Make sure the mixture is smooth and not too watery; this will help the nests hold their shape.
- Form the Nests: Lightly grease a muffin tin to prevent sticking. Using a spoon or your hands, take a generous amount of the seasoned mashed potatoes and press them into the muffin tin, forming a nest shape. Ensure that there is a hollow center in each nest to hold your toppings later. Aim for an even thickness to allow for consistent baking.
- Bake the Nests: Place the muffin tin in the preheated oven and bake for about 20 minutes. You want the edges of the nests to turn slightly golden and crispy, which adds a delightful texture.
- Add the Fillings: Once the nests are baked, carefully remove the muffin tin from the oven. Fill each nest with your choice of shredded cheese, crumbled bacon, and chopped green onions. Be generous with the toppings, as they will melt and enhance the flavor of the nests.
- Return to the Oven: Put the muffin tin back in the oven for an additional 10 minutes. This will allow the cheese to melt beautifully over the toppings, creating a deliciously gooey filling.
- Serve with Sour Cream: After baking, take the nests out of the oven and let them cool slightly before serving. Top each nest with a dollop of sour cream for an extra layer of creaminess and flavor. Enjoy your Mashed Potato Nests warm!
By following these steps closely, you’ll create stunning and tasty Mashed Potato Nests that are sure to impress your family and friends!
Nutritional Information
When enjoying your Mashed Potato Nests, it’s good to know the nutritional value they bring to your table. Here’s an estimated breakdown of the nutritional information per serving (1 nest):
- Calories: 150
- Fat: 8g
- Saturated Fat: 4g
- Unsaturated Fat: 3g
- Trans Fat: 0g
- Cholesterol: 20mg
- Sodium: 300mg
- Carbohydrates: 15g
- Fiber: 2g
- Sugar: 1g
- Protein: 5g
Please note that these values are estimates and can vary based on the specific ingredients used and portion sizes. Enjoy your Mashed Potato Nests as a flavorful and satisfying addition to your meal!
🍴 Top Kitchen Essentials You’ll Love




Why You’ll Love This Recipe
- Quick and Easy Preparation: With just a few simple steps, you can whip up Mashed Potato Nests in no time, making them a perfect choice for busy weeknights or last-minute gatherings.
- Customizable Toppings: The beauty of Mashed Potato Nests lies in their versatility. You can personalize them with your favorite toppings, whether it’s cheese, bacon, vegetables, or even a dollop of guacamole!
- Crowd-Pleaser: These delightful nests are sure to impress your guests. Their unique presentation and delicious flavors make them an instant hit at parties and family dinners.
- Comfort Food Redefined: Combining the creamy goodness of mashed potatoes with crispy edges, Mashed Potato Nests offer a comforting experience that brings warmth to any meal.
- Great for Leftovers: If you have leftover mashed potatoes, this recipe is an excellent way to use them up, transforming them into a fun and tasty dish.
Tips for Success
Creating perfect Mashed Potato Nests is easy with a few helpful tips. Keep these in mind to ensure your nests turn out delicious and visually appealing every time:
Ensure the Right Consistency of Mashed Potatoes
The texture of your mashed potatoes is crucial for forming nests. Make sure they are creamy but not too runny. If your mashed potatoes are too watery, consider adding a bit of extra butter or cheese to thicken them up. The ideal consistency should be thick enough to hold its shape when pressed into the muffin tin.
Grease the Muffin Tin Well
To prevent your Mashed Potato Nests from sticking, generously grease the muffin tin with cooking spray or butter. This will help you easily remove the nests once they are baked and golden brown.
Press Firmly to Form Nests
When shaping the nests in the muffin tin, make sure to press the mashed potatoes firmly into the sides and bottom. This will create a sturdy structure that can hold your toppings without falling apart.
Watch the Baking Time
Every oven is different, so keep an eye on the nests as they bake. You want them to turn a lovely golden brown on the edges, which typically takes about 20 minutes. If they are not browning, you can leave them in for a few extra minutes, but be careful not to overbake them.
Experiment with Toppings
Don’t be afraid to get creative with your toppings! While cheese and bacon are classic choices, consider adding sautéed vegetables, different types of cheese, or even a drizzle of your favorite sauce. The versatility of Mashed Potato Nests allows you to tailor them to your taste preferences.
Let Them Cool Slightly Before Serving
After removing the nests from the oven, let them cool for a few minutes before serving. This will help them set and make it easier to remove them from the muffin tin without breaking.
By following these tips, you’ll create stunning and delicious Mashed Potato Nests that are sure to impress your family and friends!
Variations
One of the best things about Mashed Potato Nests is their versatility. You can easily customize them to suit your tastes or dietary preferences. Here are some fun variations and ideas for toppings that can enhance the flavor of your nests:
Flavor Variations or Recipe Twists
- Cheesy Broccoli Nests: Add steamed and chopped broccoli to the mashed potatoes before forming the nests. Top with a blend of cheddar and Monterey Jack cheese for a cheesy twist.
- Spicy Southwest Nests: Mix in diced jalapeños or green chilies with your mashed potatoes. Top with pepper jack cheese, corn, and a sprinkle of cilantro for a flavorful kick.
- Italian Herb Nests: Stir in Italian herbs like oregano, basil, and garlic powder into the mashed potatoes. Fill with marinara sauce and mozzarella cheese for an Italian flair.
- Smoky BBQ Nests: Combine shredded barbecue chicken or beef with your mashed potatoes. Top with a drizzle of BBQ sauce and shredded cheese for a smoky flavor.
- Mediterranean Nests: Incorporate chopped olives, sun-dried tomatoes, and feta cheese into the mashed potatoes. Top with a dollop of tzatziki sauce for a refreshing touch.
Dietary-Friendly Adjustments
- Vegan Version: Substitute the cheese and sour cream with vegan alternatives, such as cashew cheese and coconut yogurt. Ensure the mashed potatoes are made with plant-based milk and vegan butter.
- Gluten-Free Option: This recipe is naturally gluten-free, but double-check your toppings to ensure they are also gluten-free, especially if using packaged ingredients.
- Low-Carb Variation: Swap traditional mashed potatoes with cauliflower mash for a lower-carb option that still delivers on flavor and texture.
Feel free to mix and match these variations to create your own unique Mashed Potato Nests that cater to your taste preferences and dietary needs!
Serving Suggestions
When it comes to serving Mashed Potato Nests, pairing them with complementary dishes can elevate your meal experience. Here are some fantastic suggestions to consider:
How to Serve Mashed Potato Nests
Serve your Mashed Potato Nests warm, directly from the oven, and allow guests to customize their nests with additional toppings like extra cheese, bacon bits, or fresh herbs. For a touch of elegance, consider plating the nests on a large serving platter, garnished with a sprinkle of chopped parsley or chives. This not only enhances the presentation but also invites a communal atmosphere where everyone can dive in and enjoy!
Perfect Pairings & Toppings
- Roasted Vegetables: Pair your nests with a side of seasonal roasted vegetables, such as carrots, Brussels sprouts, or asparagus. The earthy flavors of the vegetables balance the richness of the nests.
- Grilled Meat: Serve alongside grilled chicken, steak, or pork chops for a hearty meal. The savory flavors of the meat complement the creamy potato nests perfectly.
- Salads: A fresh garden salad or a Caesar salad adds a refreshing crunch and balances the richness of the nests. Consider a light vinaigrette to keep it zesty.
- Soup: Pair with a bowl of hearty soup, like tomato basil or butternut squash, to create a comforting and satisfying meal. The nests can even be used as a fun topping for the soup!
- Dipping Sauces: Offer a variety of dipping sauces like ranch dressing, barbecue sauce, or a spicy aioli for an extra flavor boost. Guests will love customizing their bites!
By thoughtfully pairing your Mashed Potato Nests with these dishes, you can create a well-rounded meal that will leave everyone satisfied and impressed!
Storage & Reheating Instructions
To keep your delicious Mashed Potato Nests fresh and enjoyable, it’s important to store them properly and know how to reheat them without losing their flavor and texture. Follow these guidelines to ensure your leftovers stay tasty!
Best Storage Methods
Once your Mashed Potato Nests have cooled to room temperature, transfer them to an airtight container. If you prefer, you can also wrap them tightly in plastic wrap or aluminum foil. Store the nests in the refrigerator for up to 3 days. For longer storage, consider freezing them. Place the nests on a baking sheet to freeze individually for about an hour, then transfer them to a freezer-safe container or zip-top bag. They can be frozen for up to 2 months.
Reheating Tips
When it’s time to enjoy your stored Mashed Potato Nests again, reheating them properly is key to maintaining their deliciousness:
- Oven Method: Preheat your oven to 350°F (175°C). Place the nests on a baking sheet and cover them loosely with aluminum foil to prevent them from drying out. Heat for about 15-20 minutes or until warmed through, checking occasionally to avoid overcooking.
- Microwave Method: For a quicker option, you can reheat the nests in the microwave. Place them on a microwave-safe plate and cover with a damp paper towel to retain moisture. Heat in 30-second intervals until warm, being careful not to overheat, as this can make them rubbery.
- Skillet Method: If you prefer a crispy texture, reheat the nests in a skillet over medium heat. Add a small amount of butter or oil to the pan and cook for a few minutes on each side until heated through and crispy.
By following these storage and reheating instructions, you can enjoy your Mashed Potato Nests anytime, keeping their delightful flavors and textures intact!
Print
Mashed Potato Nests
- Total Time: 45 minutes
- Yield: 12 nests 1x
- Diet: Vegetarian
Description
Delicious mashed potato nests filled with your choice of toppings.
Ingredients
- 2 cups mashed potatoes
- 1 cup shredded cheese
- 1/2 cup cooked bacon, crumbled
- 1/4 cup green onions, chopped
- 1/2 cup sour cream
- Salt and pepper to taste
Instructions
- Preheat your oven to 375°F (190°C).
- In a bowl, mix the mashed potatoes with salt and pepper.
- Using a muffin tin, form the mashed potatoes into nests.
- Bake the nests for 20 minutes until slightly golden.
- Remove from oven and fill each nest with cheese, bacon, and green onions.
- Return to the oven for an additional 10 minutes.
- Top with sour cream before serving.
Notes
- You can use any toppings of your choice.
- Make sure the mashed potatoes are not too watery.
- Prep Time: 15 minutes
- Cook Time: 30 minutes
- Category: Side Dish
- Method: Baking
- Cuisine: American
Nutrition
- Serving Size: 1 nest
- Calories: 150
- Sugar: 1g
- Sodium: 300mg
- Fat: 8g
- Saturated Fat: 4g
- Unsaturated Fat: 3g
- Trans Fat: 0g
- Carbohydrates: 15g
- Fiber: 2g
- Protein: 5g
- Cholesterol: 20mg
Keywords: Mashed Potato Nests