

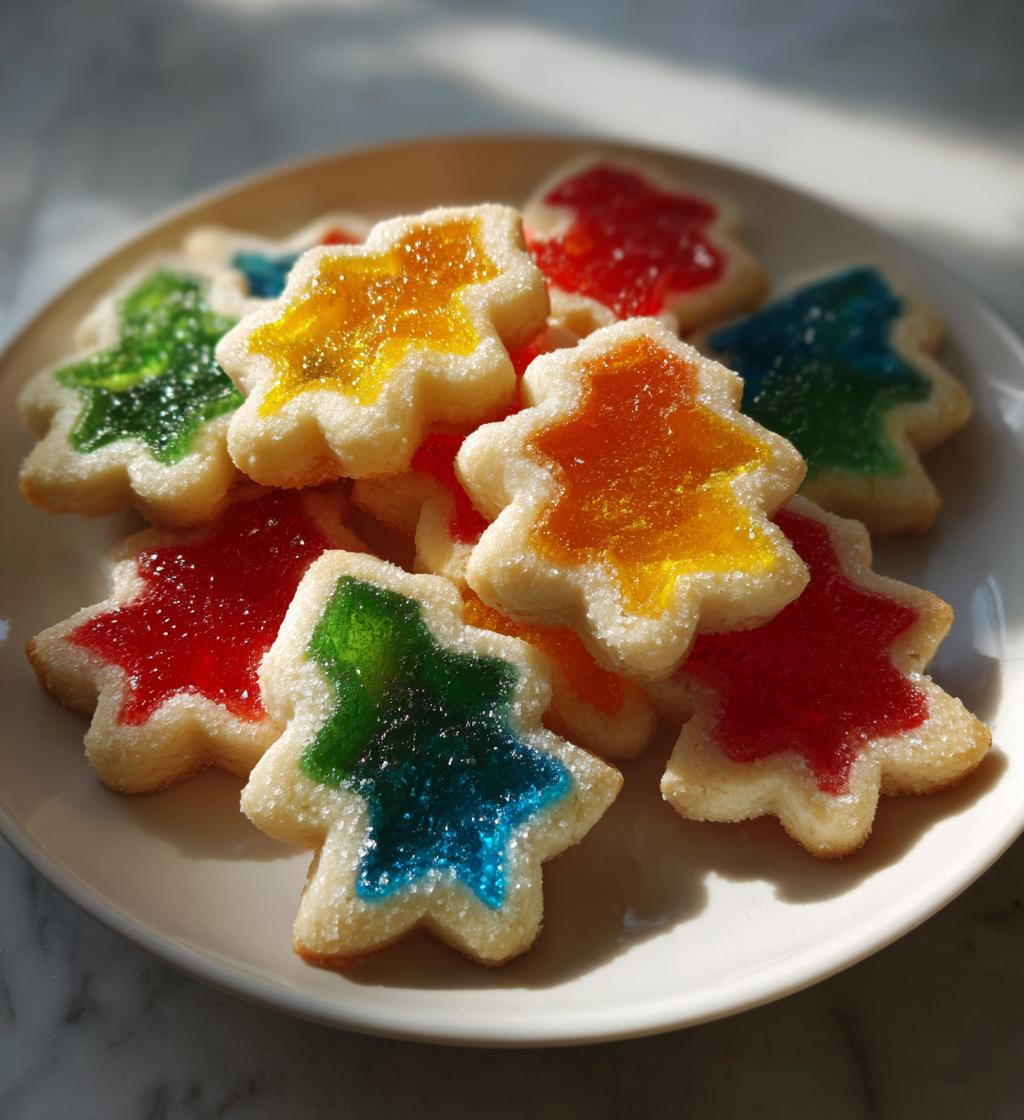
The holiday season is a magical time filled with warmth, joy, and, of course, delicious treats! One of the most delightful ways to celebrate this festive period is by baking Christmas Stained Glass Cookies. These colorful, eye-catching cookies not only taste great but also bring a vibrant touch to your holiday gatherings. Imagine a platter full of cookies that resemble beautiful stained glass windows, each one glistening with the colorful candy filling that shines through delicate cut-outs. Perfect for sharing with family and friends, these cookies are sure to be a hit at any holiday celebration. Whether you’re an experienced baker or a beginner, making Christmas Stained Glass Cookies is a fun and rewarding experience that will fill your home with delightful aromas and create lasting memories. Get ready to roll up your sleeves and embark on a joyful baking adventure this holiday season!

Ingredients List
- 2 3/4 cups all-purpose flour
- 1 teaspoon baking powder
- 1/2 teaspoon salt
- 1 cup unsalted butter, softened
- 1 1/2 cups granulated sugar
- 1 large egg
- 1 teaspoon vanilla extract
- 1 cup crushed hard candies (such as Jolly Ranchers)
How to Prepare Christmas Stained Glass Cookies
Preparing the Dough
To start making your Christmas Stained Glass Cookies, you’ll want to prepare the dough properly for the best results. First, preheat your oven to 350°F (175°C) so it’s ready for your cookies later. In a medium bowl, combine 2 3/4 cups of all-purpose flour, 1 teaspoon of baking powder, and 1/2 teaspoon of salt. Whisk these dry ingredients together to ensure even distribution and set aside.
In a separate large mixing bowl, cream together 1 cup of softened unsalted butter and 1 1/2 cups of granulated sugar until the mixture is light and fluffy. This step is crucial as it incorporates air into the butter, which will help the cookies rise and achieve a nice texture. Once you’ve reached that fluffy consistency, add in 1 large egg and 1 teaspoon of vanilla extract, mixing well until fully combined. Gradually incorporate the flour mixture into the wet ingredients, mixing until just combined. Avoid overmixing, as this can lead to tougher cookies. After the dough comes together, wrap it in plastic wrap and chill it in the refrigerator for at least 30 minutes. Chilling helps the dough firm up, making it easier to roll out later.
Shaping and Cutting the Cookies
After chilling, remove the dough from the refrigerator and let it sit for a few minutes to soften slightly for easier handling. On a floured surface, roll out the dough to about 1/4 inch thick. Use cookie cutters to cut out your desired shapes, such as stars, trees, or circles. Remember, these will be the outer shapes of your cookies.
Next, to create the stained glass effect, take a smaller cookie cutter and cut out a shape from the center of each cookie. This will be where the crushed hard candies will go. Ensure to keep the cut-out shapes, as you can bake them too if desired, though they won’t have the stained glass effect. Place the cookies on a baking sheet lined with parchment paper, leaving some space between each cookie for spreading.
Baking the Cookies
Once all your cookies are shaped and arranged on the baking sheet, it’s time to fill them with color! Carefully place 1 tablespoon of crushed hard candies (like Jolly Ranchers) into the center of each cookie. The candies will melt and create that beautiful stained glass effect.
Now, bake the cookies in your preheated oven for 8-10 minutes. Keep a close eye on them; you want the edges to be lightly golden, while the candy filling should be melted but not bubbling over. Once done, remove the baking sheet from the oven and let the cookies cool on the sheet for a few minutes before transferring them to a wire rack to cool completely. Enjoy the vibrant colors and delightful aromas as your Christmas Stained Glass Cookies come to life!
Why You’ll Love This Recipe
Christmas Stained Glass Cookies are not just a treat for the taste buds; they’re also a feast for the eyes. Here are a few reasons why this recipe will become a holiday favorite:
- Festive Appearance: The colorful candy centers create a stunning stained glass effect, making them a beautiful addition to any holiday table.
- Easy to Prepare: With simple ingredients and straightforward steps, even novice bakers can master this recipe with ease.
- Perfect for Gifting: These cookies make delightful gifts for friends, family, and neighbors, wrapped in festive packaging or placed on a cookie platter.
- Customizable: You can use various shapes and colors of hard candies, allowing for endless creative possibilities.
- Fun Activity: Baking Christmas Stained Glass Cookies is a joyful activity for families, creating lasting memories that can be cherished for years to come.
🍴 Top Kitchen Essentials You’ll Love




Tips for Success
To ensure your Christmas Stained Glass Cookies turn out perfectly every time, here are some practical tips to enhance your cookie-making experience:
- Chill the Dough: Always remember to chill the dough for at least 30 minutes before rolling it out. This makes the dough easier to handle and helps maintain the cookie shape during baking.
- Use Variety of Candy Colors: Experiment with different colors of hard candies for a vibrant stained glass effect. Mixing and matching colors can create festive designs that are visually stunning.
- Don’t Overmix: When combining the wet and dry ingredients, mix until just combined to avoid tough cookies. Overmixing can lead to a chewy texture instead of a tender cookie.
- Watch Your Baking Time: Keep a close eye on the cookies as they bake. Remove them from the oven as soon as the edges turn golden to prevent overbaking.
- Cool Properly: Allow cookies to cool on the baking sheet for a few minutes before transferring them to a wire rack. This helps them set and prevents breakage.
Serving Suggestions
Christmas Stained Glass Cookies are not only a visual treat but also a delightful addition to your holiday festivities. Serve these colorful cookies alongside a warm mug of hot cocoa or spiced holiday cider for a cozy pairing that will warm your spirits. They also make an eye-catching centerpiece on any holiday cookie platter, perfect for sharing at gatherings or parties. For an added festive touch, consider stacking the cookies in a clear glass jar tied with a ribbon, making them an inviting gift for friends and family. Enjoy these cookies as a sweet treat during holiday movie nights or while decorating the tree!
Nutritional Information
Please note that nutritional values may vary based on the specific ingredients and brands used in this recipe, and the information provided is an estimate. Typically, one Christmas Stained Glass Cookie contains approximately:
- Calories: 150
- Fat: 7g
- Protein: 1g
- Carbohydrates: 20g
These cookies are a delightful treat to enjoy during the holiday season, but remember to indulge in moderation as part of a balanced diet!
FAQ Section
Can I use different types of hard candies?
Absolutely! You can use a variety of hard candies to create beautiful stained glass effects in your Christmas Stained Glass Cookies. Popular choices include Jolly Ranchers, Life Savers, or any clear, brightly colored hard candies. Just make sure they can melt well to achieve that vibrant, glass-like appearance. Mixing different colors can also add to the festive look of your cookies.
How should I store the cookies?
To keep your Christmas Stained Glass Cookies fresh, store them in an airtight container at room temperature. This will help maintain their texture and flavor. If you live in a very humid environment, consider placing parchment paper between layers of cookies to avoid sticking. They can last for about a week, making them perfect for holiday gatherings!
Can I freeze these cookies?
Yes, you can freeze Christmas Stained Glass Cookies! To do so, ensure they are completely cooled, then place them in a single layer in an airtight container or freezer bag. For best results, separate layers with parchment paper. They can be frozen for up to three months. When you’re ready to enjoy them, simply thaw at room temperature. This way, you can prepare these festive treats ahead of time and have them ready for holiday celebrations!
For more festive recipes, check out this collection of Christmas cookies!
Print
Christmas Stained Glass Cookies
- Total Time: 40 minutes
- Yield: 24 cookies 1x
- Diet: Vegetarian
Description
Colorful and festive Christmas Stained Glass Cookies are a delightful treat for the holiday season.
Ingredients
- 2 3/4 cups all-purpose flour
- 1 teaspoon baking powder
- 1/2 teaspoon salt
- 1 cup unsalted butter, softened
- 1 1/2 cups granulated sugar
- 1 large egg
- 1 teaspoon vanilla extract
- 1 cup crushed hard candies (like Jolly Ranchers)
Instructions
- Preheat your oven to 350°F (175°C).
- In a bowl, mix flour, baking powder, and salt.
- In another bowl, beat butter and sugar until light and fluffy.
- Add the egg and vanilla to the butter mixture and mix well.
- Gradually add the flour mixture to the wet mixture until combined.
- Chill the dough for 30 minutes.
- Roll out the dough on a floured surface and cut out shapes.
- Cut out a smaller shape in the center of each cookie.
- Place crushed candies in the center of each cut-out shape.
- Bake for 8-10 minutes or until the edges are lightly golden.
- Let cookies cool on the baking sheet for a few minutes before transferring to a wire rack.
🍴 Top Kitchen Essentials You’ll Love
Notes
- Use different colors of hard candies for a variety of stained glass effects.
- Store cookies in an airtight container to keep them fresh.
- Prep Time: 30 minutes
- Cook Time: 10 minutes
- Category: Dessert
- Method: Baking
- Cuisine: American
Nutrition
- Serving Size: 1 cookie
- Calories: 150
- Sugar: 10g
- Sodium: 50mg
- Fat: 7g
- Saturated Fat: 4g
- Unsaturated Fat: 2g
- Trans Fat: 0g
- Carbohydrates: 20g
- Fiber: 0g
- Protein: 1g
- Cholesterol: 20mg
Keywords: Christmas Stained Glass Cookies, holiday cookies, festive treats