

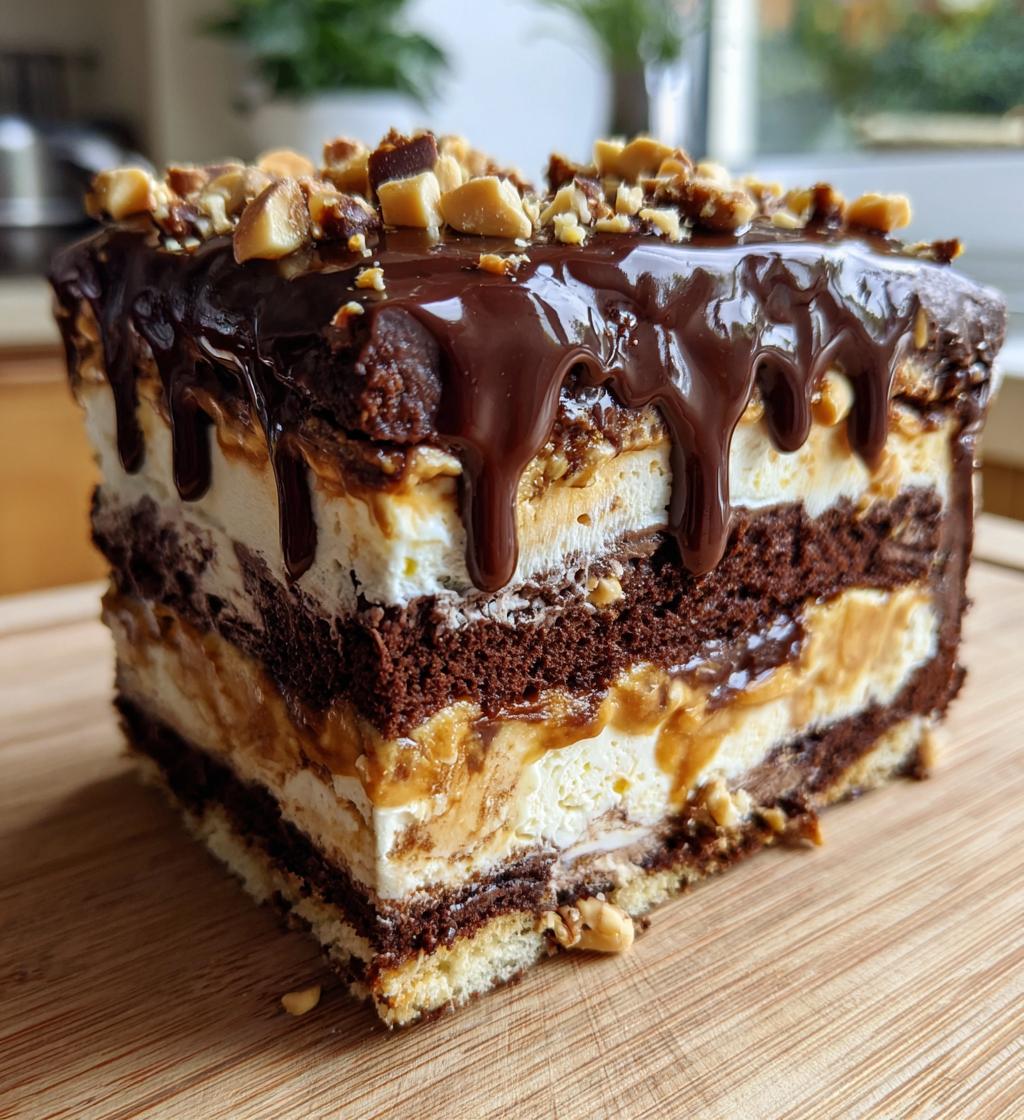
If you’re looking for a dessert that combines all the best elements of your favorite ice cream treats, then the Buster Bar Ice Cream Cake is your answer. Imagine luscious layers of rich chocolate and creamy vanilla ice cream, all nestled between a crunchy topping of crushed cookies and peanuts, drizzled with rich chocolate fudge. This delightful cake is not only visually stunning but also a treat for your taste buds, making it the perfect dessert for any occasion—from summer parties to cozy family gatherings.
What makes this cake truly special is its versatility; you can customize it with your favorite ice cream flavors and toppings, ensuring each bite is a delightful surprise. Personally, I cherish the memories of making ice cream cakes with my family, and this recipe brings back all those warm, nostalgic feelings. Whether you’re an ice cream lover or just looking to impress your guests, the Buster Bar Ice Cream Cake is a guaranteed crowd-pleaser that will have everyone coming back for seconds!
Ingredients List
To create a delicious Buster Bar Ice Cream Cake, you’ll need the following ingredients, measured precisely for your convenience:
- 1 box of chocolate ice cream (1.5 quarts) – Choose a high-quality chocolate ice cream for the best flavor.
- 1 box of vanilla ice cream (1.5 quarts) – A creamy vanilla ice cream balances the richness of the chocolate.
- 1 cup of chocolate fudge sauce – Look for a thick, rich fudge sauce to enhance the layers.
- 1 cup of crushed peanuts – These add a delightful crunch; use roasted peanuts for extra flavor.
- 1 package of chocolate sandwich cookies (crushed) – Any chocolate sandwich cookies will work; they provide a tasty crunch.
- 1 container of whipped topping (8 oz) – Whipped topping creates a light finish on the cake.
- Chocolate shavings for garnish – Optional, but they add an elegant touch to your dessert.
How to Prepare Buster Bar Ice Cream Cake
Step 1: Prepare the Pan
Start by lining a 9×13 inch pan with plastic wrap. This step is essential as it prevents the ice cream cake from sticking to the pan and makes it easier to remove once frozen. Make sure the plastic wrap hangs over the edges of the pan, as this will allow you to lift the cake out for slicing after it has set.
Step 2: Layer Chocolate Ice Cream
Once the pan is prepared, take the chocolate ice cream out of the freezer and let it sit at room temperature for about 5 minutes to soften slightly. Using a spatula, spread the chocolate ice cream evenly across the bottom of the lined pan. Aim for a smooth, even layer, ensuring that it reaches all corners of the pan for uniformity. The ice cream should be thick enough to hold its shape but soft enough to spread easily.
Step 3: Add Fudge Sauce and Peanuts
Next, drizzle half of the chocolate fudge sauce over the chocolate ice cream layer. Use a spoon to spread it gently, ensuring an even distribution. After that, sprinkle half of the crushed peanuts over the fudge sauce. This combination not only adds flavor but also creates a delightful crunch that complements the ice cream.
Step 4: Layer Vanilla Ice Cream
Now it’s time to add the vanilla ice cream. Just like with the chocolate layer, allow the vanilla ice cream to soften for about 5 minutes before spreading. Carefully spread the vanilla ice cream over the chocolate layer, using a spatula to maintain a smooth surface. Make sure to cover the chocolate layer completely, ensuring there are no gaps.
Step 5: Finish with Fudge, Cookies, and Topping
Drizzle the remaining fudge sauce over the vanilla ice cream layer, allowing it to create beautiful swirls. Then, sprinkle the crushed chocolate sandwich cookies evenly on top of the fudge sauce. Finally, take the whipped topping and spread it over the crushed cookies, creating a light and creamy finish. To achieve a visually appealing look, you can use a spatula to create swirls or peaks in the whipped topping.
Step 6: Freeze the Cake
Once all the layers are assembled, carefully cover the entire cake with the overhanging plastic wrap. Place the cake in the freezer and let it freeze for at least 4 hours, or until completely set. To check if the cake is ready, gently press on the top; it should feel firm to the touch. After freezing, your Buster Bar Ice Cream Cake will be ready to slice and serve!
Why You’ll Love This Recipe
- Quick and Easy: The Buster Bar Ice Cream Cake can be assembled in just 20 minutes, making it a perfect last-minute dessert option.
- No Baking Required: With no baking involved, you can enjoy a delicious dessert without the hassle of heating up the oven.
- Delicious Layers: The combination of chocolate and vanilla ice cream with rich fudge and crunchy toppings creates an irresistible flavor profile.
- Customizable: You can easily personalize this cake by swapping out ice cream flavors or adding your favorite toppings.
- Perfect for Gatherings: This ice cream cake is a crowd-pleaser, ideal for parties, barbecues, or family gatherings.
- Make Ahead: Prepare the cake in advance and keep it in the freezer, ensuring you have a delightful dessert ready whenever you need it.
- Fun for Everyone: Kids and adults alike will love the crunchy texture and creamy layers, making it a hit with all ages.
🍴 Top Kitchen Essentials You’ll Love




Tips for Success
Creating the perfect Buster Bar Ice Cream Cake is all about attention to detail and a few pro tips to ensure your dessert is a hit. Here are some helpful suggestions to achieve the best results:
Avoid These Common Mistakes
- Not Softening Ice Cream: Make sure to let your ice cream soften for a few minutes before spreading it. This helps achieve a smoother layer and prevents the ice cream from tearing.
- Overfilling the Layers: While it may be tempting to add more ice cream or toppings, be cautious not to overfill the layers. Each layer should be even to ensure stability.
- Skipping the Plastic Wrap: Don’t forget to line the pan with plastic wrap! This step is crucial for easy removal and serving.
Helpful Tricks for Success
- Use a Hot Knife: For clean slices, dip a sharp knife in hot water before cutting the cake. This will help you cut through the layers without causing them to crumble.
- Chill Your Serving Plates: If you’re serving the cake on a warm day, consider chilling your serving plates in the freezer for a few minutes before serving. This helps keep the cake from melting too quickly.
- Garnish with Fresh Ingredients: For an extra touch, consider garnishing the top with fresh berries or additional crushed nuts just before serving.
- Experiment with Layering Techniques: Don’t be afraid to get creative with how you layer the ice cream and toppings. Swirling the fudge sauce can add a beautiful aesthetic!
By following these tips, you’ll ensure that your Buster Bar Ice Cream Cake turns out beautifully and impresses everyone at your gathering!
Nutritional Information Section
When it comes to enjoying a delicious Buster Bar Ice Cream Cake, it’s good to be aware of the nutritional content. Below is a general overview of the nutritional information per serving:
- Calories: 350
- Sugar: 30g
- Sodium: 150mg
- Fat: 18g
- Saturated Fat: 10g
- Unsaturated Fat: 5g
- Trans Fat: 0g
- Carbohydrates: 45g
- Fiber: 1g
- Protein: 4g
- Cholesterol: 30mg
Please note that these values may vary based on the specific ingredients and brands you use in your Buster Bar Ice Cream Cake. For the most accurate nutritional information, consider calculating based on the actual products you choose. Always enjoy desserts like this in moderation as part of a balanced diet!
FAQ Section
Can I use different ice cream flavors?
Absolutely! One of the great things about the Buster Bar Ice Cream Cake is its versatility. You can easily swap out the chocolate and vanilla ice cream for your favorite flavors. Consider using strawberry, cookie dough, or mint chocolate chip for a unique twist. Just keep in mind that the flavor combinations should complement each other for the best taste experience.
How do I store leftovers?
To maintain the freshness of your Buster Bar Ice Cream Cake, store any leftovers in the freezer. Make sure to cover the cake tightly with plastic wrap or aluminum foil to prevent freezer burn. If you have a cake container, that can also work well for storage. Properly stored, the cake should remain delicious for up to a week in the freezer.
Can I make this cake ahead of time?
Yes, you can definitely prepare the Buster Bar Ice Cream Cake ahead of time! In fact, it’s a great idea to make it a day or two in advance, allowing the layers to set properly. Just remember to cover it well before placing it in the freezer. This way, you’ll have a delightful dessert ready whenever you need it, making it perfect for parties or gatherings.
How do I slice the cake?
Slicing a frozen Buster Bar Ice Cream Cake can be tricky, but there are some tips to make it easier. First, let the cake sit at room temperature for about 5-10 minutes before slicing to soften slightly. Use a sharp knife dipped in hot water for a clean cut, wiping it dry between slices. This technique helps prevent the layers from sticking to the knife and creates neat slices.
What can I use instead of crushed peanuts?
If you’re looking for alternatives to crushed peanuts due to allergies or personal preferences, there are several options. You can use crushed almonds, walnuts, or pecans for a similar crunch. If you need a nut-free option, consider using crushed pretzels or even chocolate chips for added texture and flavor. Just ensure that any substitutions align with your guests’ dietary needs.
Serving Suggestions
The Buster Bar Ice Cream Cake is a delightful dessert that pairs wonderfully with a variety of dishes and drinks. Here are some suggestions to enhance your dining experience:
How to Serve Buster Bar Ice Cream Cake
When serving your Buster Bar Ice Cream Cake, it’s best to allow it to sit at room temperature for a few minutes after removing it from the freezer. This will make slicing easier and ensure that the ice cream is creamy and enjoyable. For presentation, consider using a large, sharp knife to cut the cake into even slices, and serve each slice on a chilled dessert plate. A drizzle of chocolate fudge or caramel sauce on the plate can elevate the visual appeal.
Perfect Pairings & Toppings
To complement the rich flavors of the Buster Bar Ice Cream Cake, consider serving it alongside some of the following:
- Fresh Berries: Strawberries, raspberries, or blueberries can provide a refreshing contrast to the cake’s sweetness.
- Whipped Cream: A dollop of freshly whipped cream on top of each slice adds a light and airy texture.
- Chocolate or Caramel Sauce: Additional drizzles of chocolate or caramel sauce can enhance the dessert’s richness.
- Ice Cream Floats: Pair the cake with an ice cream float made with root beer or cola for a nostalgic treat.
- Coffee or Espresso: The bold flavors of coffee or espresso provide a perfect balance to the sweetness of the cake.
- Milkshakes: Serve with a chocolate or vanilla milkshake for a fun and indulgent combination.
These pairings not only enhance the overall experience but also allow your guests to customize their dessert to their liking, making the Buster Bar Ice Cream Cake a truly memorable treat!
Print
Buster Bar Ice Cream Cake
- Total Time: 4 hours 20 minutes
- Yield: 12 servings 1x
- Diet: Vegetarian
Description
A delicious Buster Bar Ice Cream Cake that combines layers of chocolate and vanilla ice cream with a crunchy topping.
Ingredients
- 1 box of chocolate ice cream (1.5 quarts)
- 1 box of vanilla ice cream (1.5 quarts)
- 1 cup of chocolate fudge sauce
- 1 cup of crushed peanuts
- 1 package of chocolate sandwich cookies (crushed)
- 1 container of whipped topping (8 oz)
- Chocolate shavings for garnish
Instructions
- Line a 9×13 inch pan with plastic wrap.
- Spread the chocolate ice cream evenly in the bottom of the pan.
- Drizzle half of the chocolate fudge sauce over the chocolate ice cream.
- Sprinkle half of the crushed peanuts over the fudge sauce.
- Spread the vanilla ice cream over the chocolate layer.
- Drizzle the remaining fudge sauce over the vanilla ice cream.
- Sprinkle the crushed cookies on top of the fudge sauce.
- Spread the whipped topping over the crushed cookies.
- Top with chocolate shavings for garnish.
- Cover with plastic wrap and freeze for at least 4 hours.
Notes
- Let the cake sit at room temperature for a few minutes before slicing.
- You can substitute other flavors of ice cream if desired.
- Store leftovers in the freezer.
- Prep Time: 20 minutes
- Cook Time: 0 minutes
- Category: Dessert
- Method: Freezing
- Cuisine: American
Nutrition
- Serving Size: 1 slice
- Calories: 350
- Sugar: 30g
- Sodium: 150mg
- Fat: 18g
- Saturated Fat: 10g
- Unsaturated Fat: 5g
- Trans Fat: 0g
- Carbohydrates: 45g
- Fiber: 1g
- Protein: 4g
- Cholesterol: 30mg
Keywords: Buster Bar Ice Cream Cake, dessert, ice cream cake